Import Guide
When it is not possible to establish a real-time data stream from a source, such as an offline system, historical orders, or certain CRM providers, Kevel Audience supports data onboarding through secure file uploads or specific third-party API integrations.
Quick-Start
Upload Files to a Bucket
The first step towards importing data into Kevel Audience is uploading your files. We recommend using the S3 bucket dedicated to your Audience system. You can learn more about this process on the Upload Files to a Bucket documentation page. Uploading a file does not start an import by itself, unless an automated import is already set up to watch the folder. The next step sets the import up.
Setup the Import
The second step is to configure the import in the Audience dashboard (in the Collect > Data Imports area), by clicking the New import button.
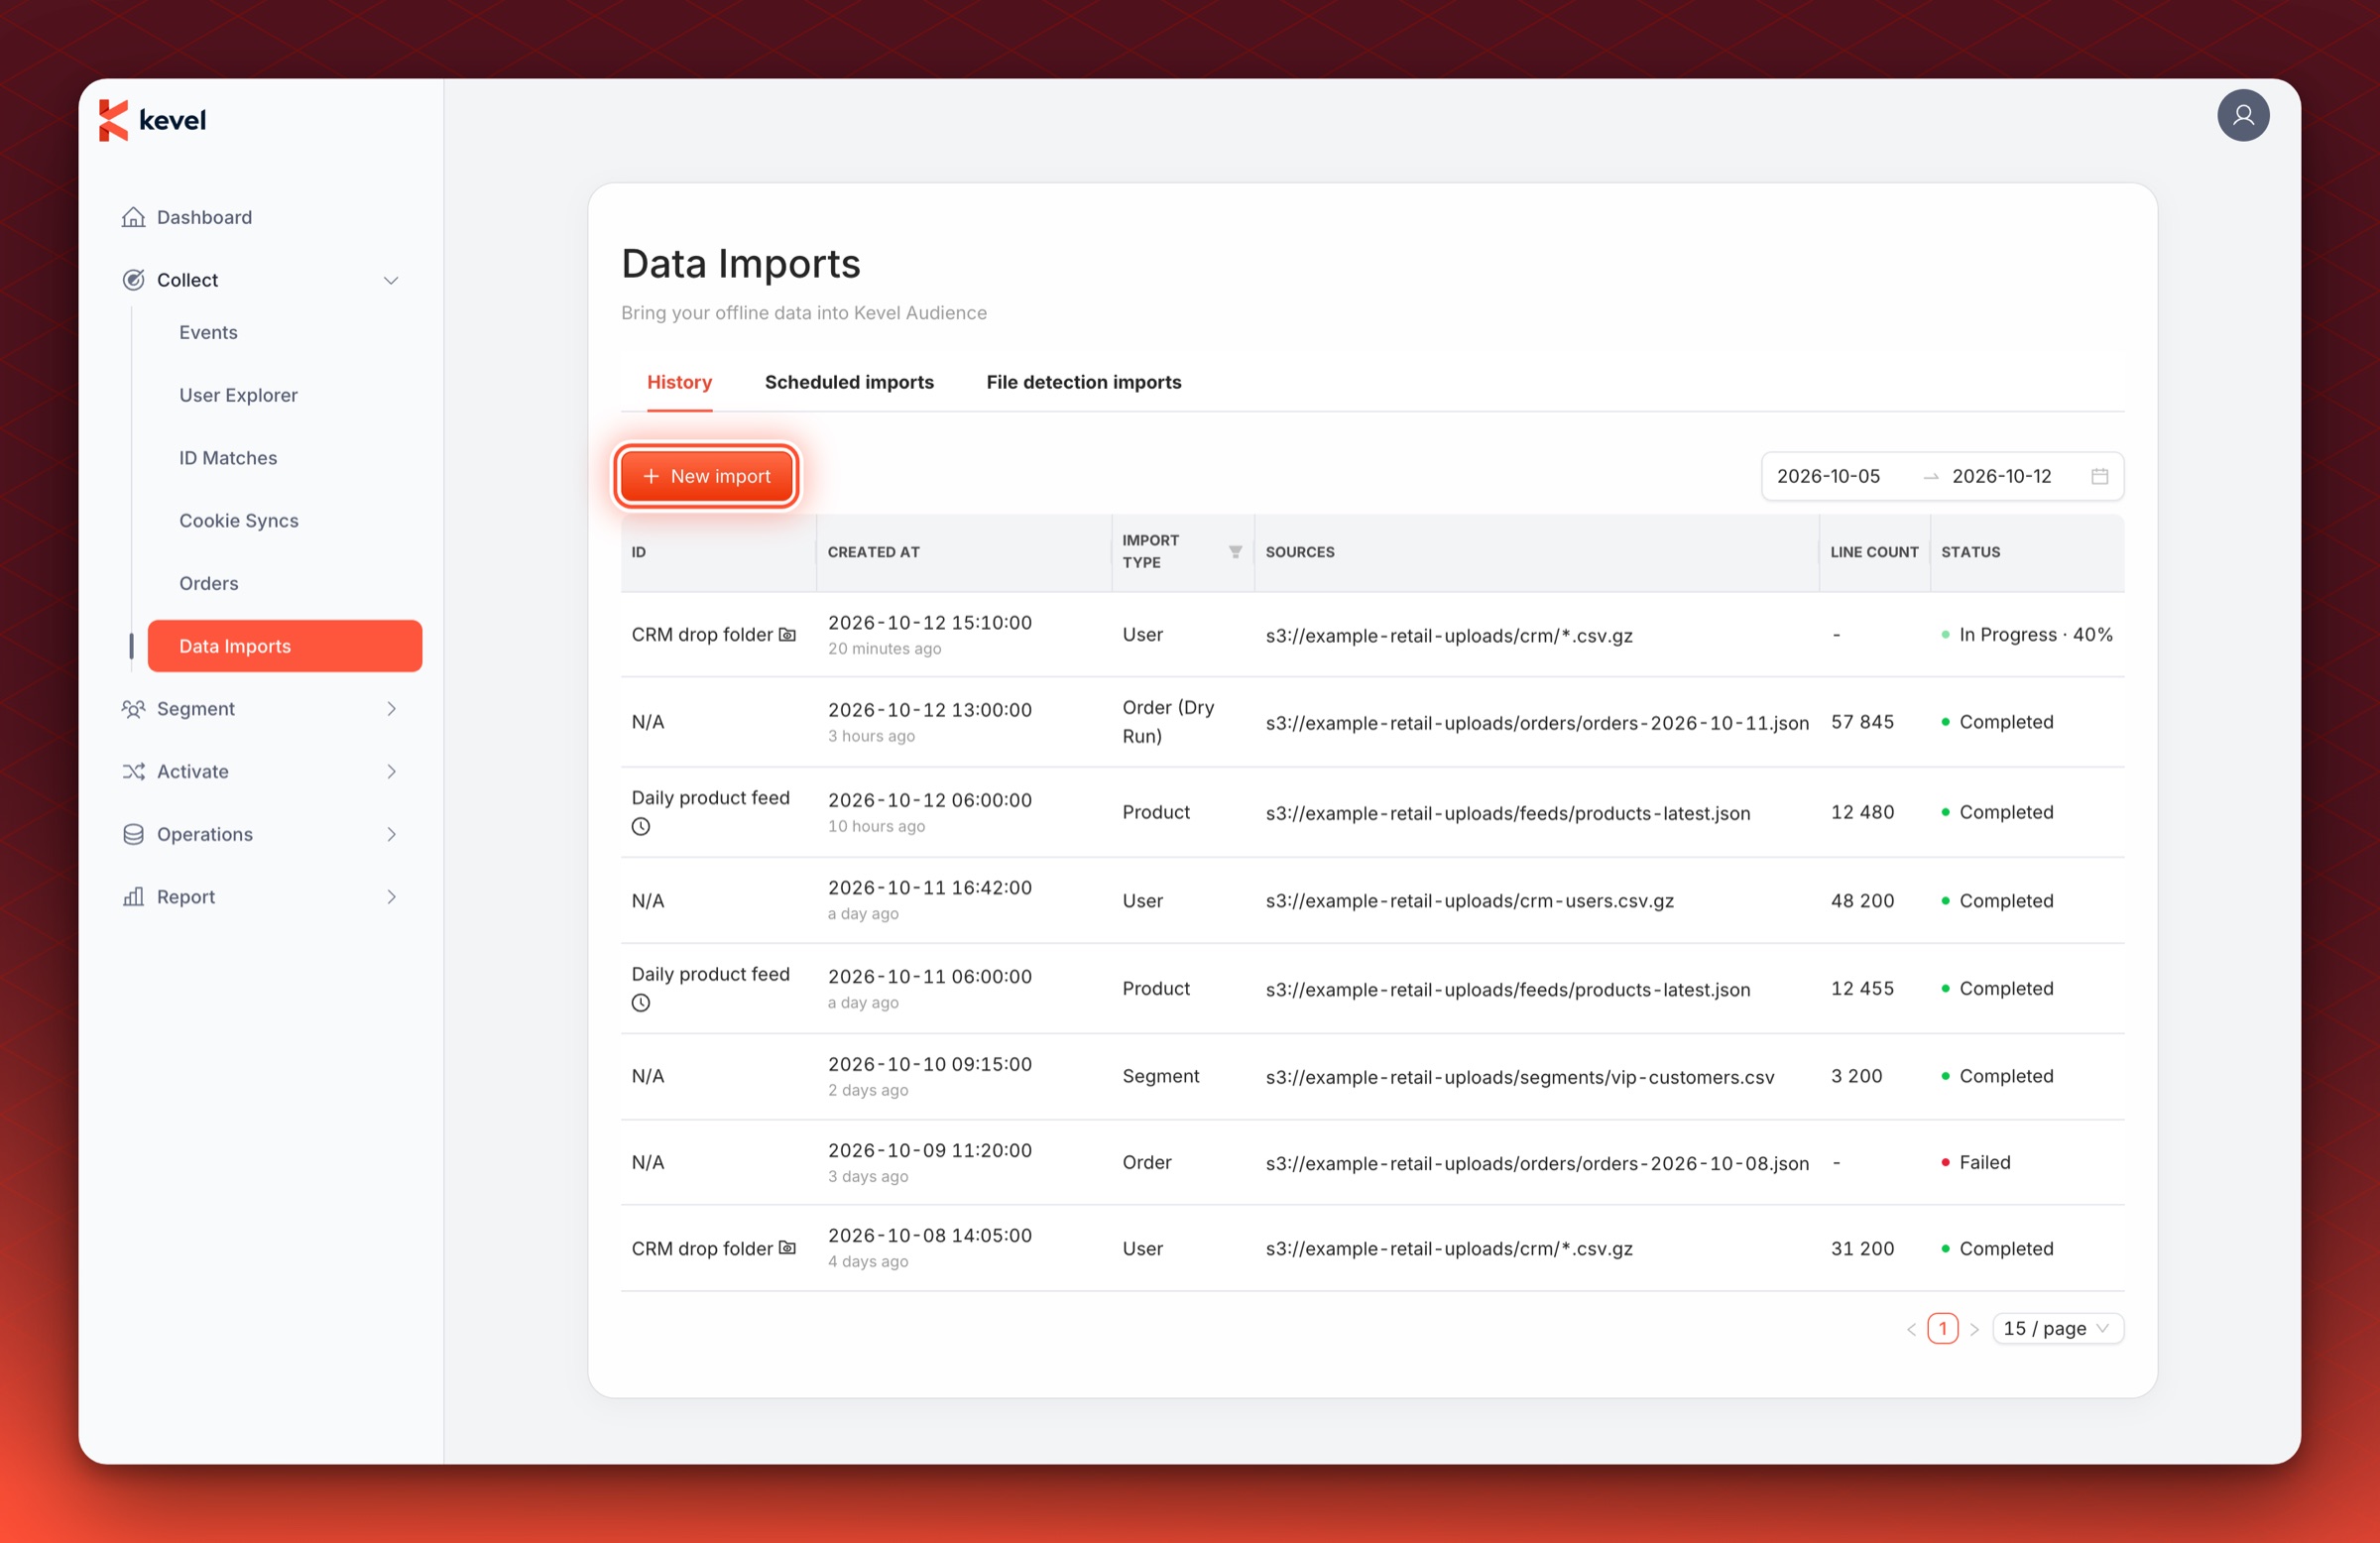
From here, you can configure these types of imports:
- Order imports - Import order data.
- User imports - Import CRM data.
- Product imports - Import product information.
- Segment imports - Import externally built user segments.
Before starting an import, make sure that:
- Your files are properly encoded as UTF-8 or that the appropriate encoding is selected when importing;
- The IDs (user IDs, order IDs, product IDs) in the imported files match the ones sent by events;
- Required fields are present in all lines;
- The fields have the correct keys (case sensitive).
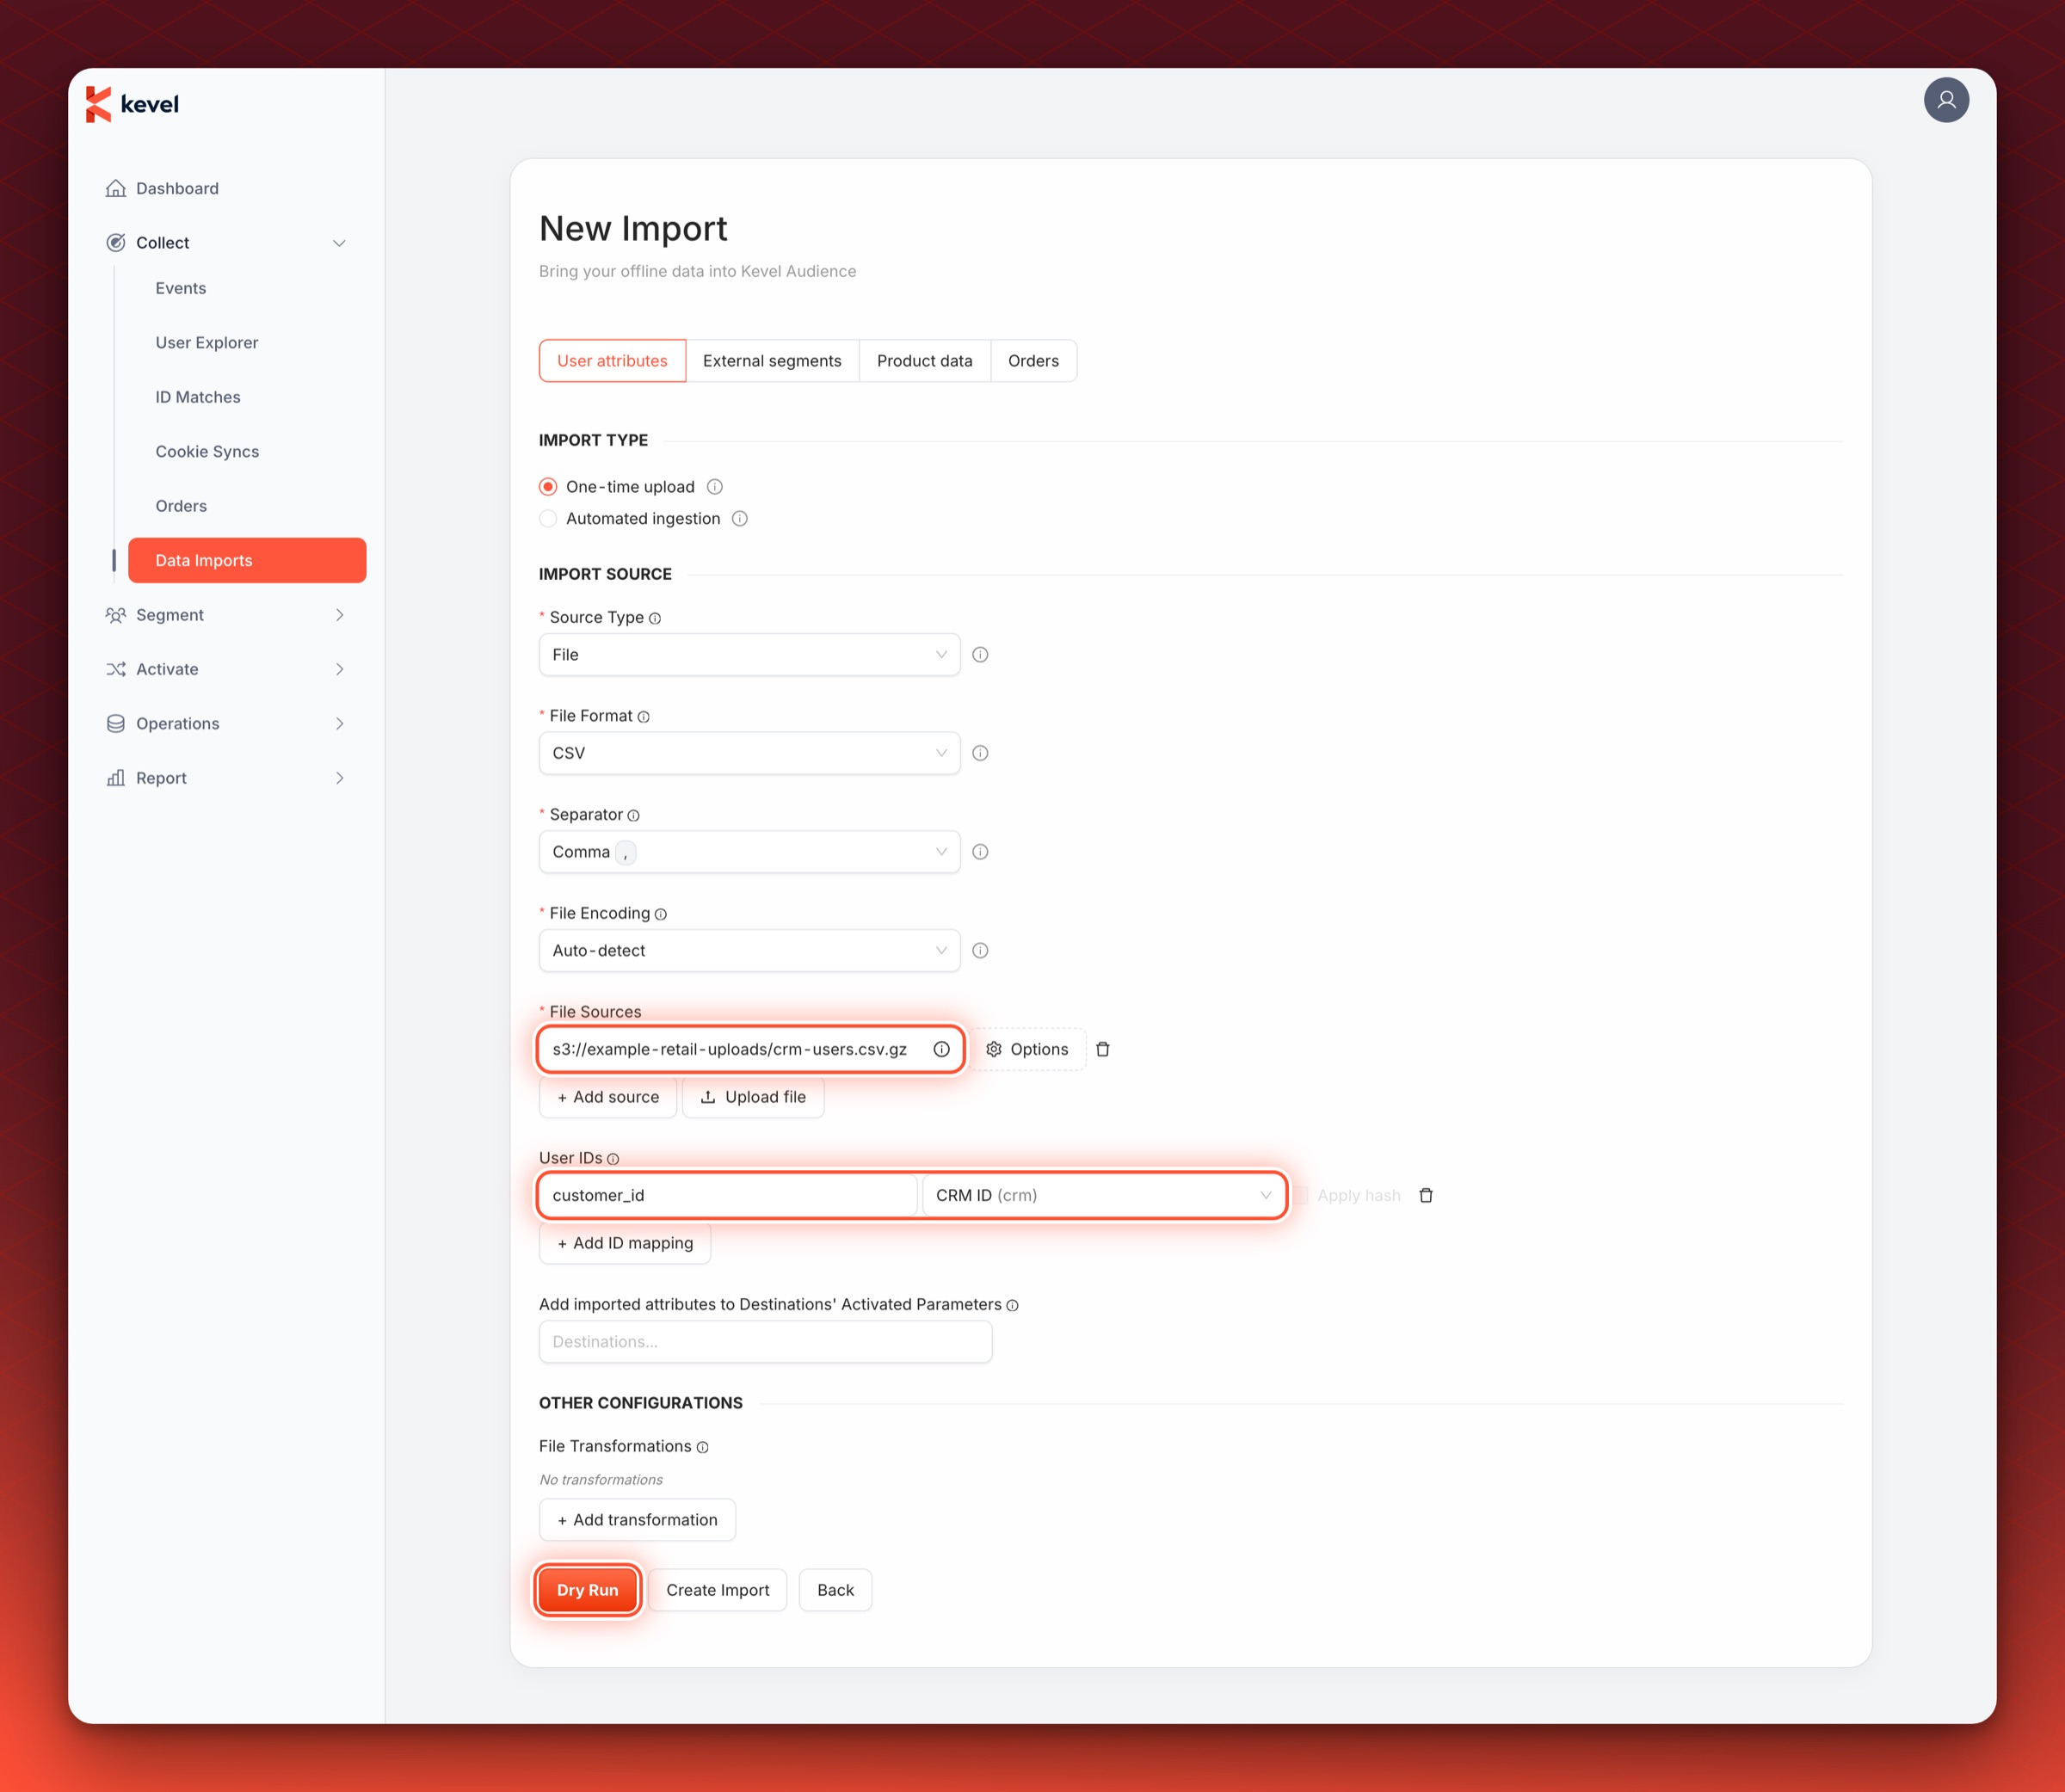
A user import that reads one CSV file from the dedicated bucket looks like this when it is ready to run.
Dry Run
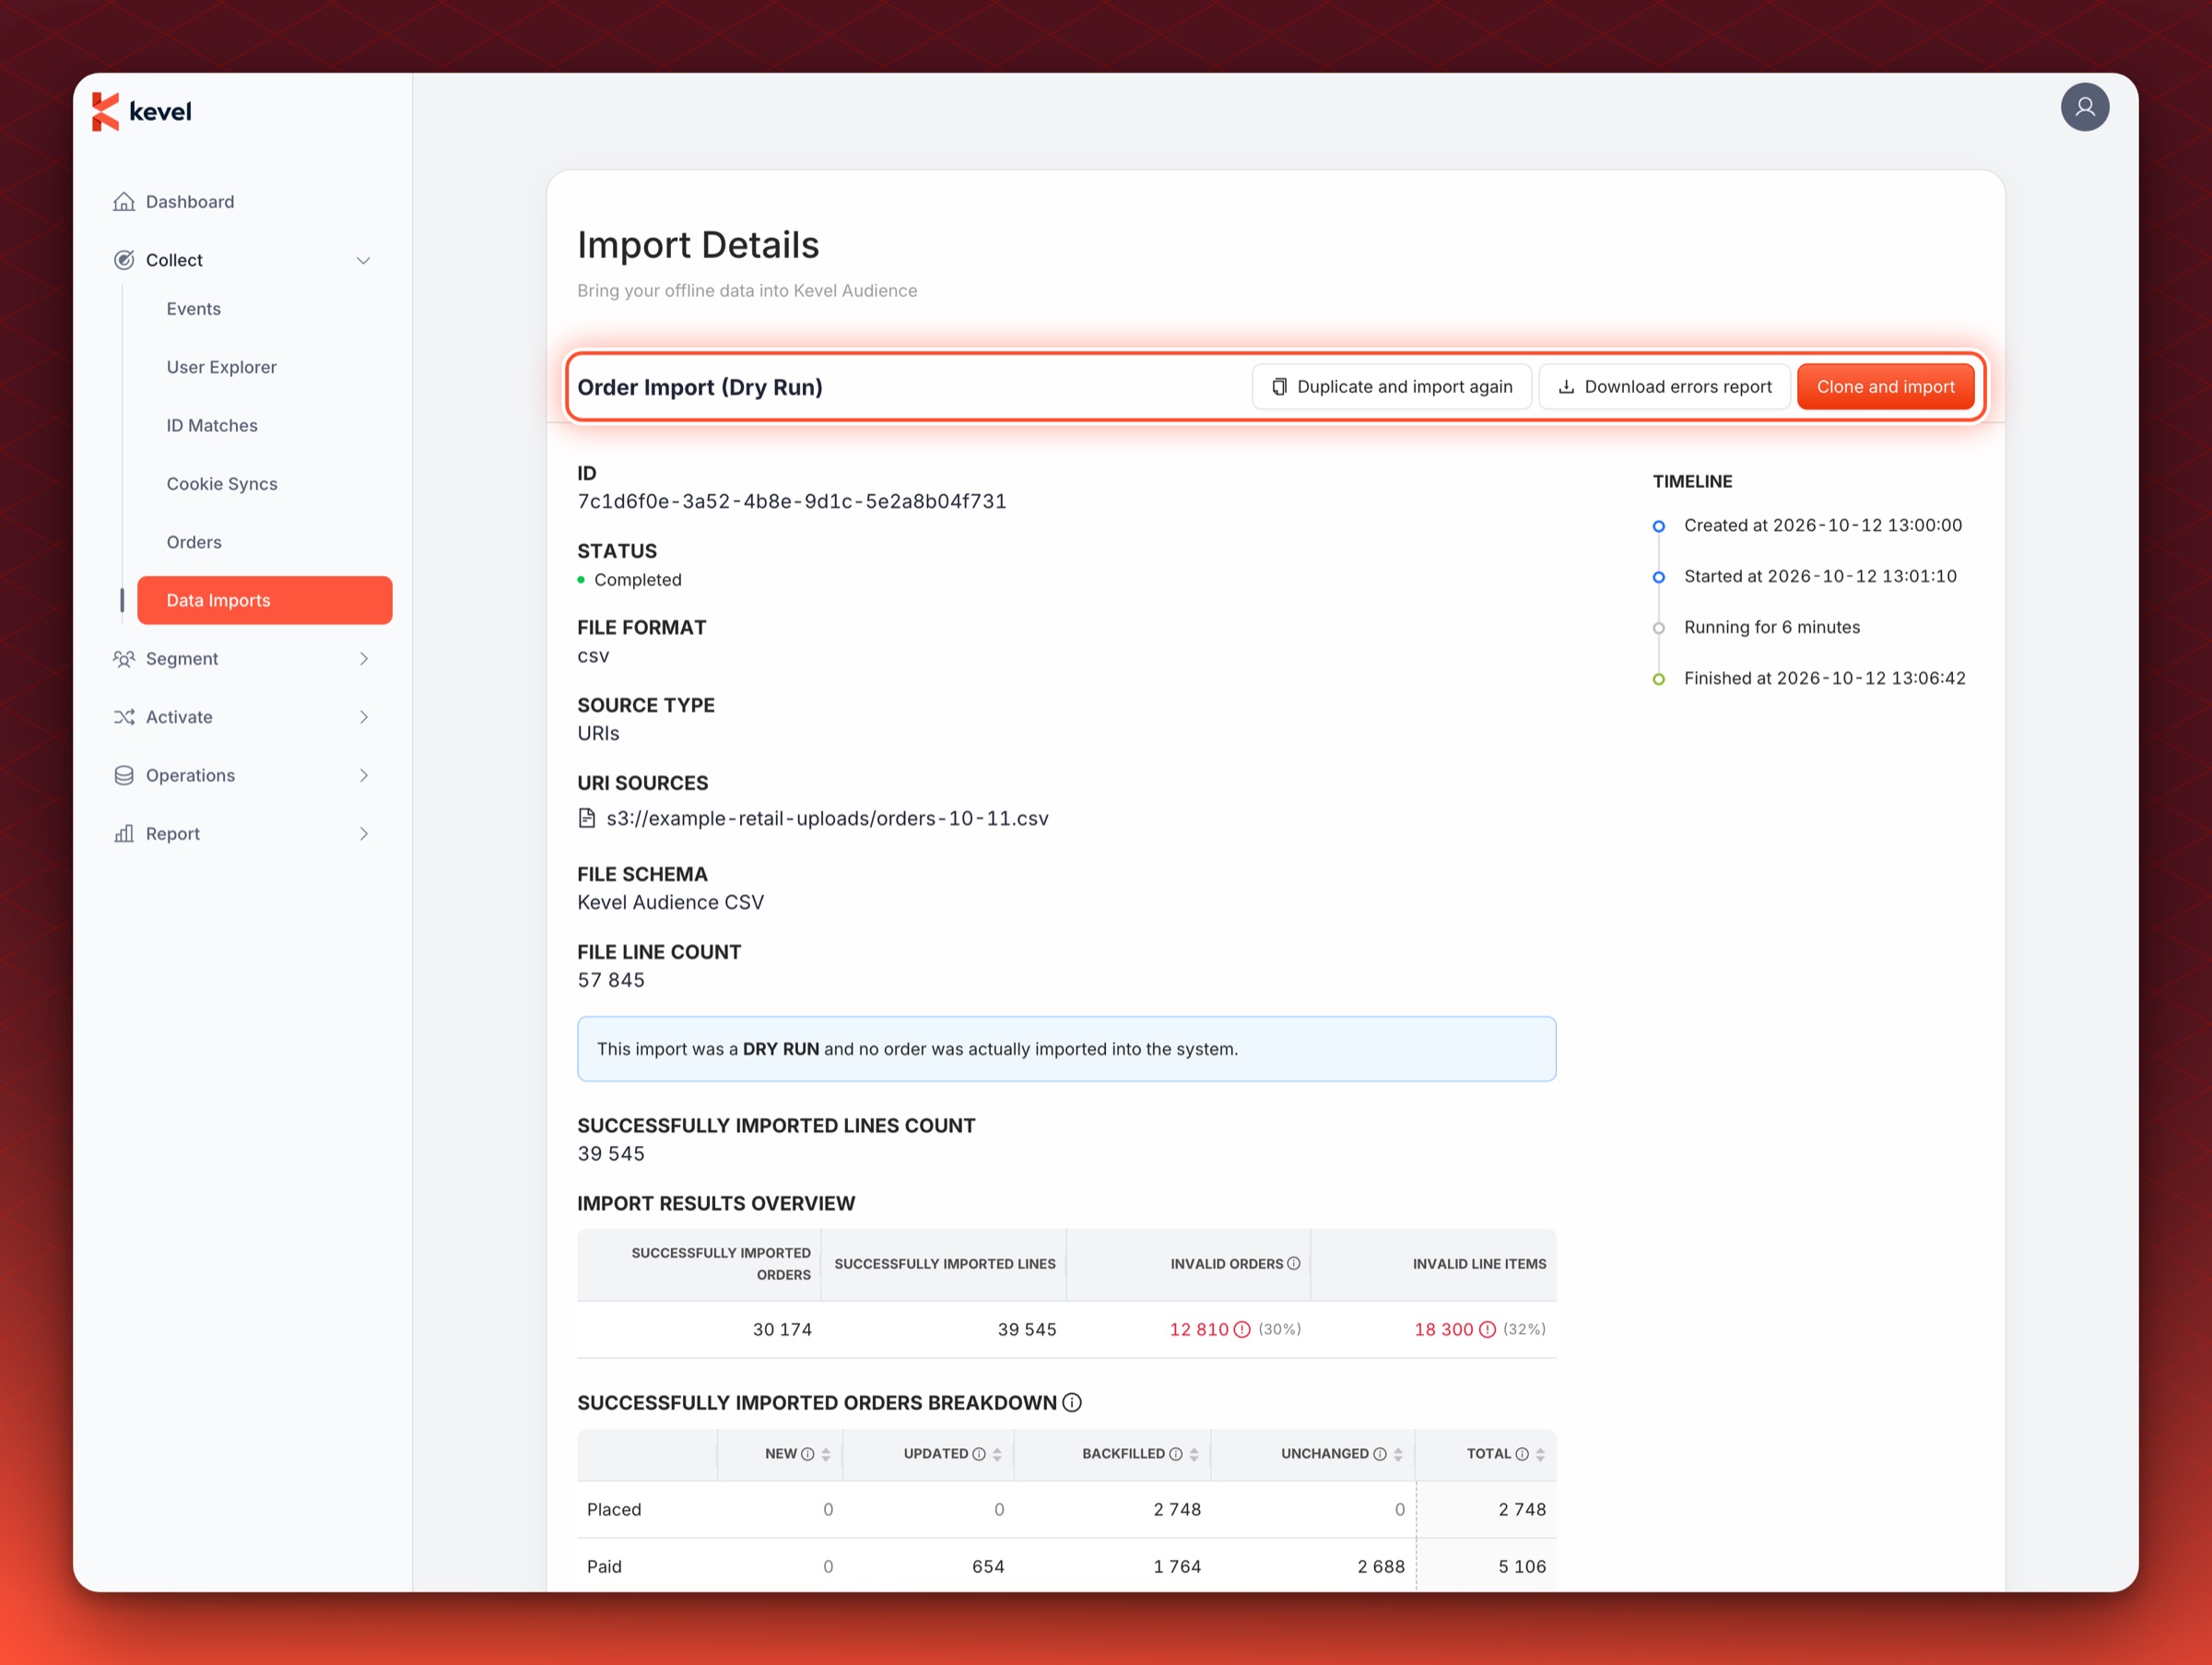
A Dry Run of an import is a simulation of the import, where everything in the import pipeline runs except for storing the imported data. This means the files are downloaded and read, transformations (if any) are applied, and the values are validated. The results of a dry run, which include errors and some statistics on the values on the files, are displayed in the same way as the results of an actual import, save for a banner that informs that it is a dry run.
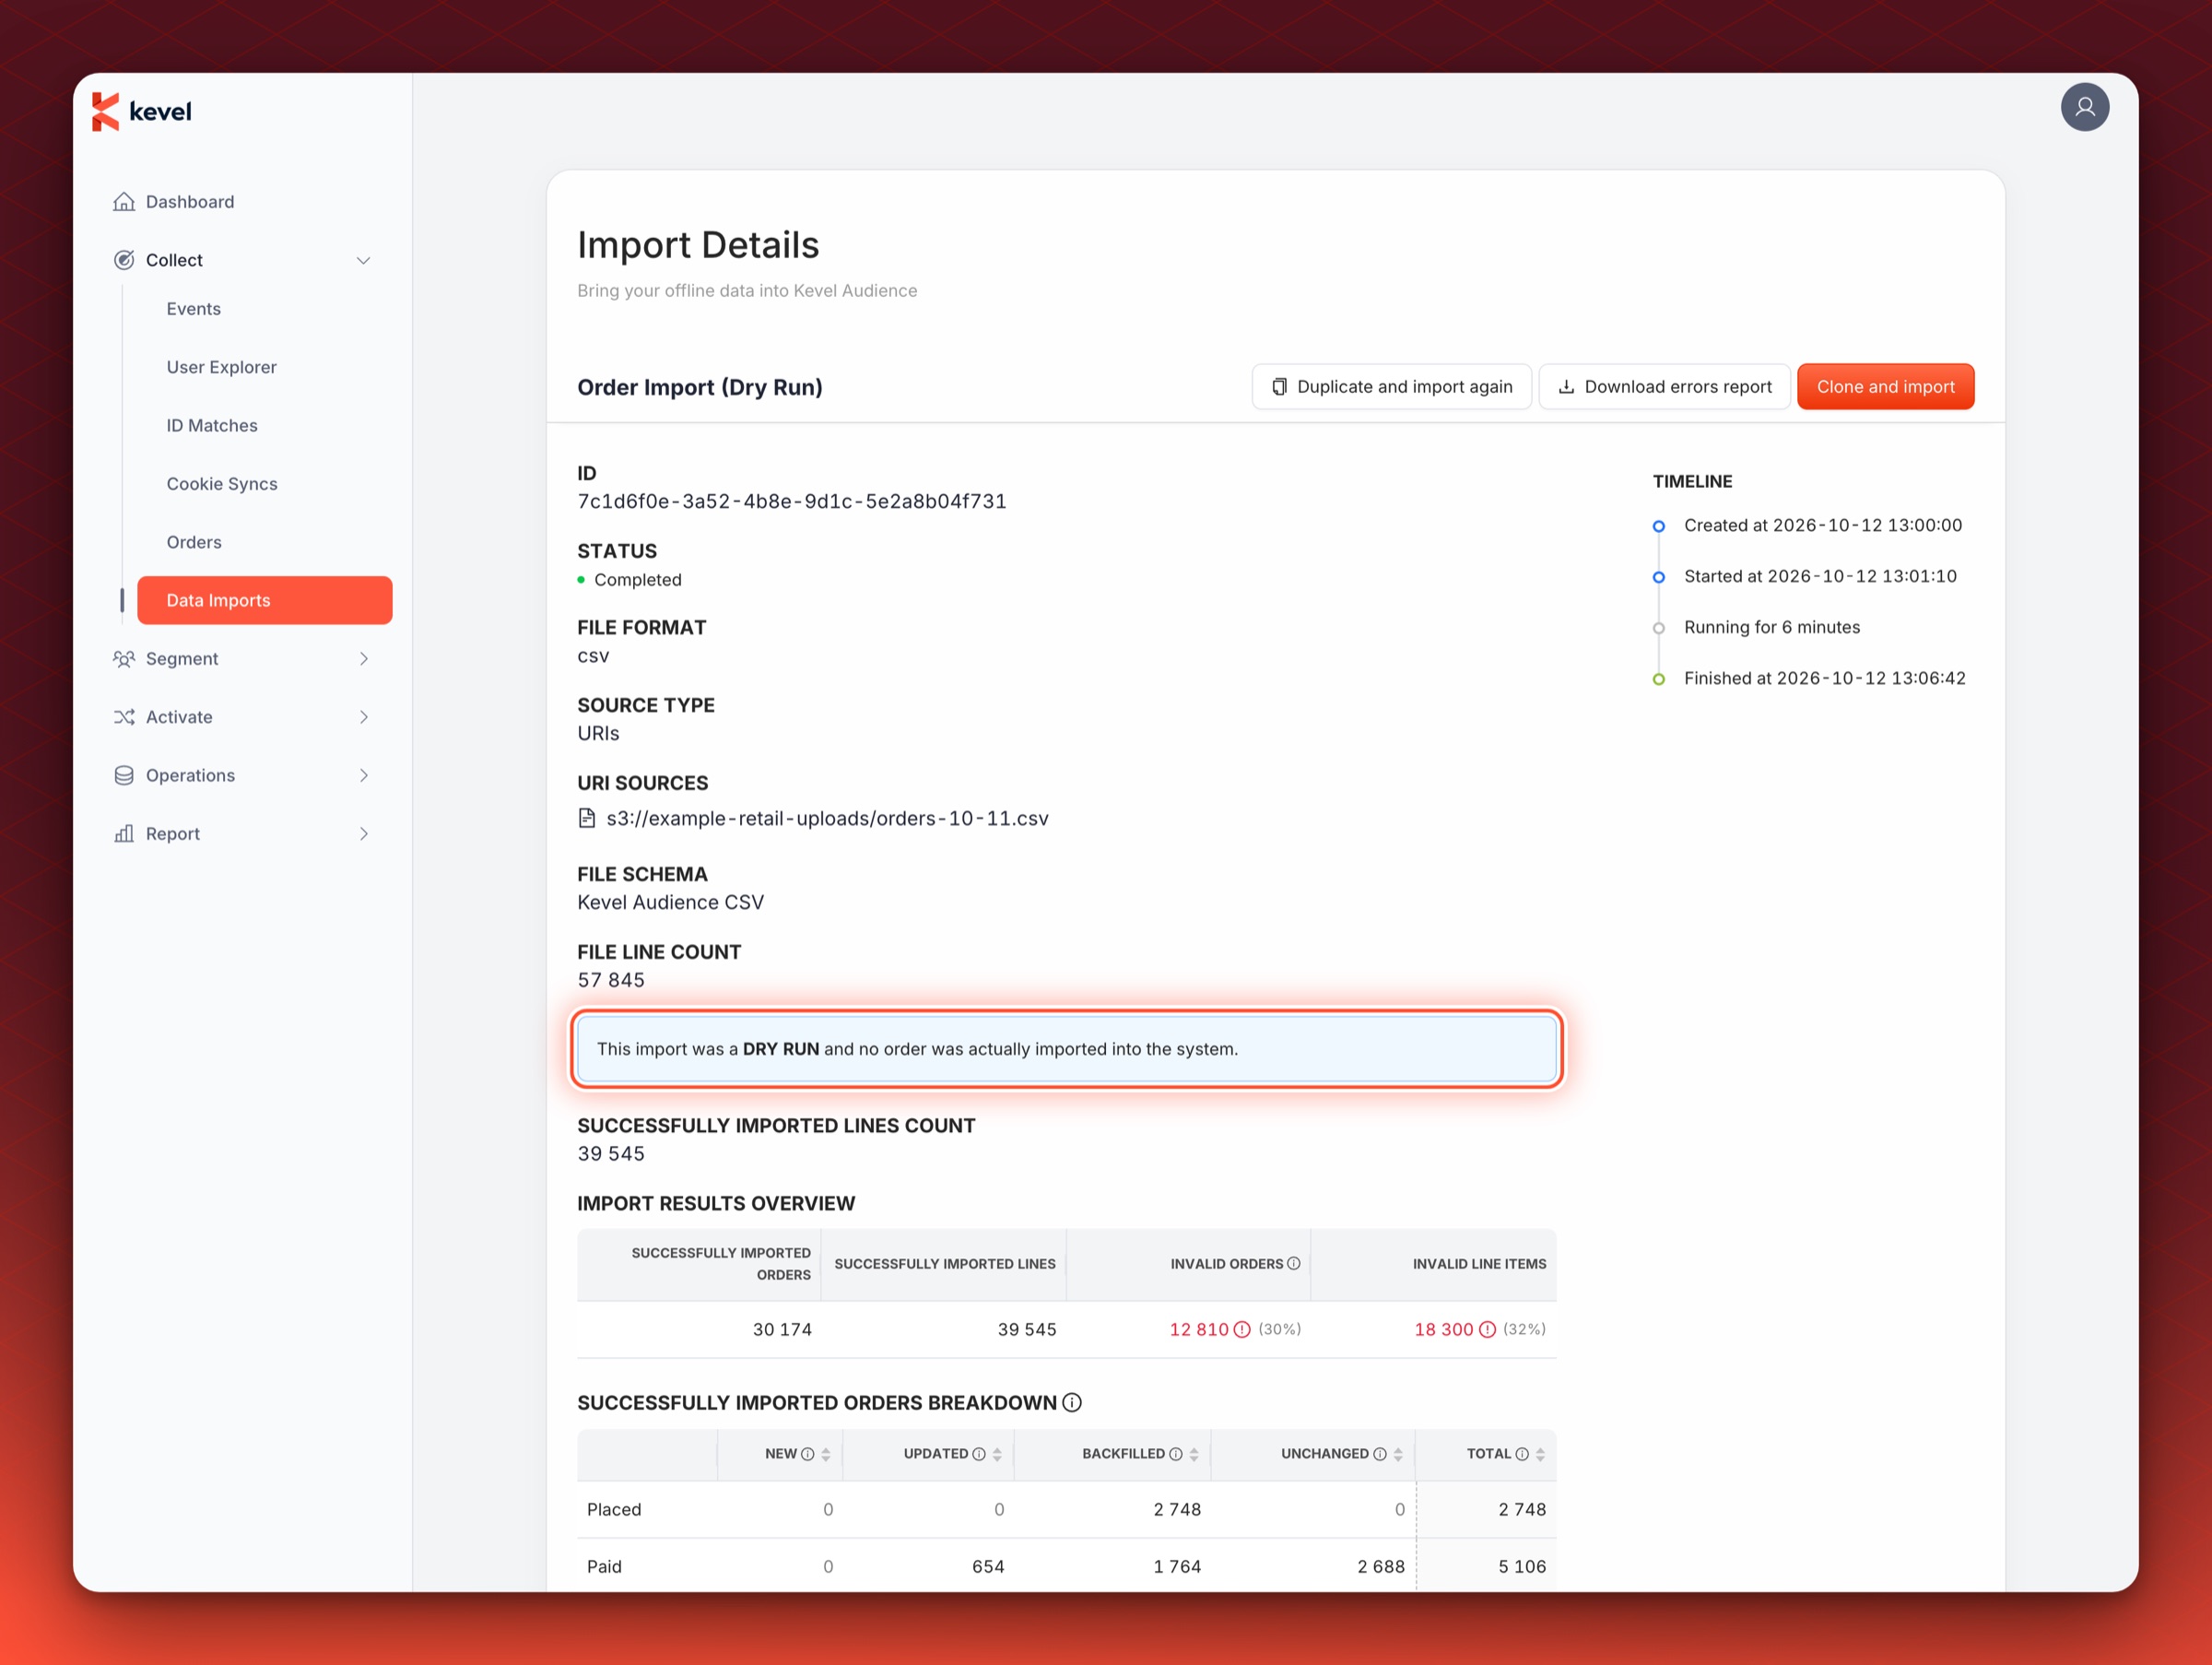
It is recommended to dry run before performing the import to ensure data will be imported as expected.
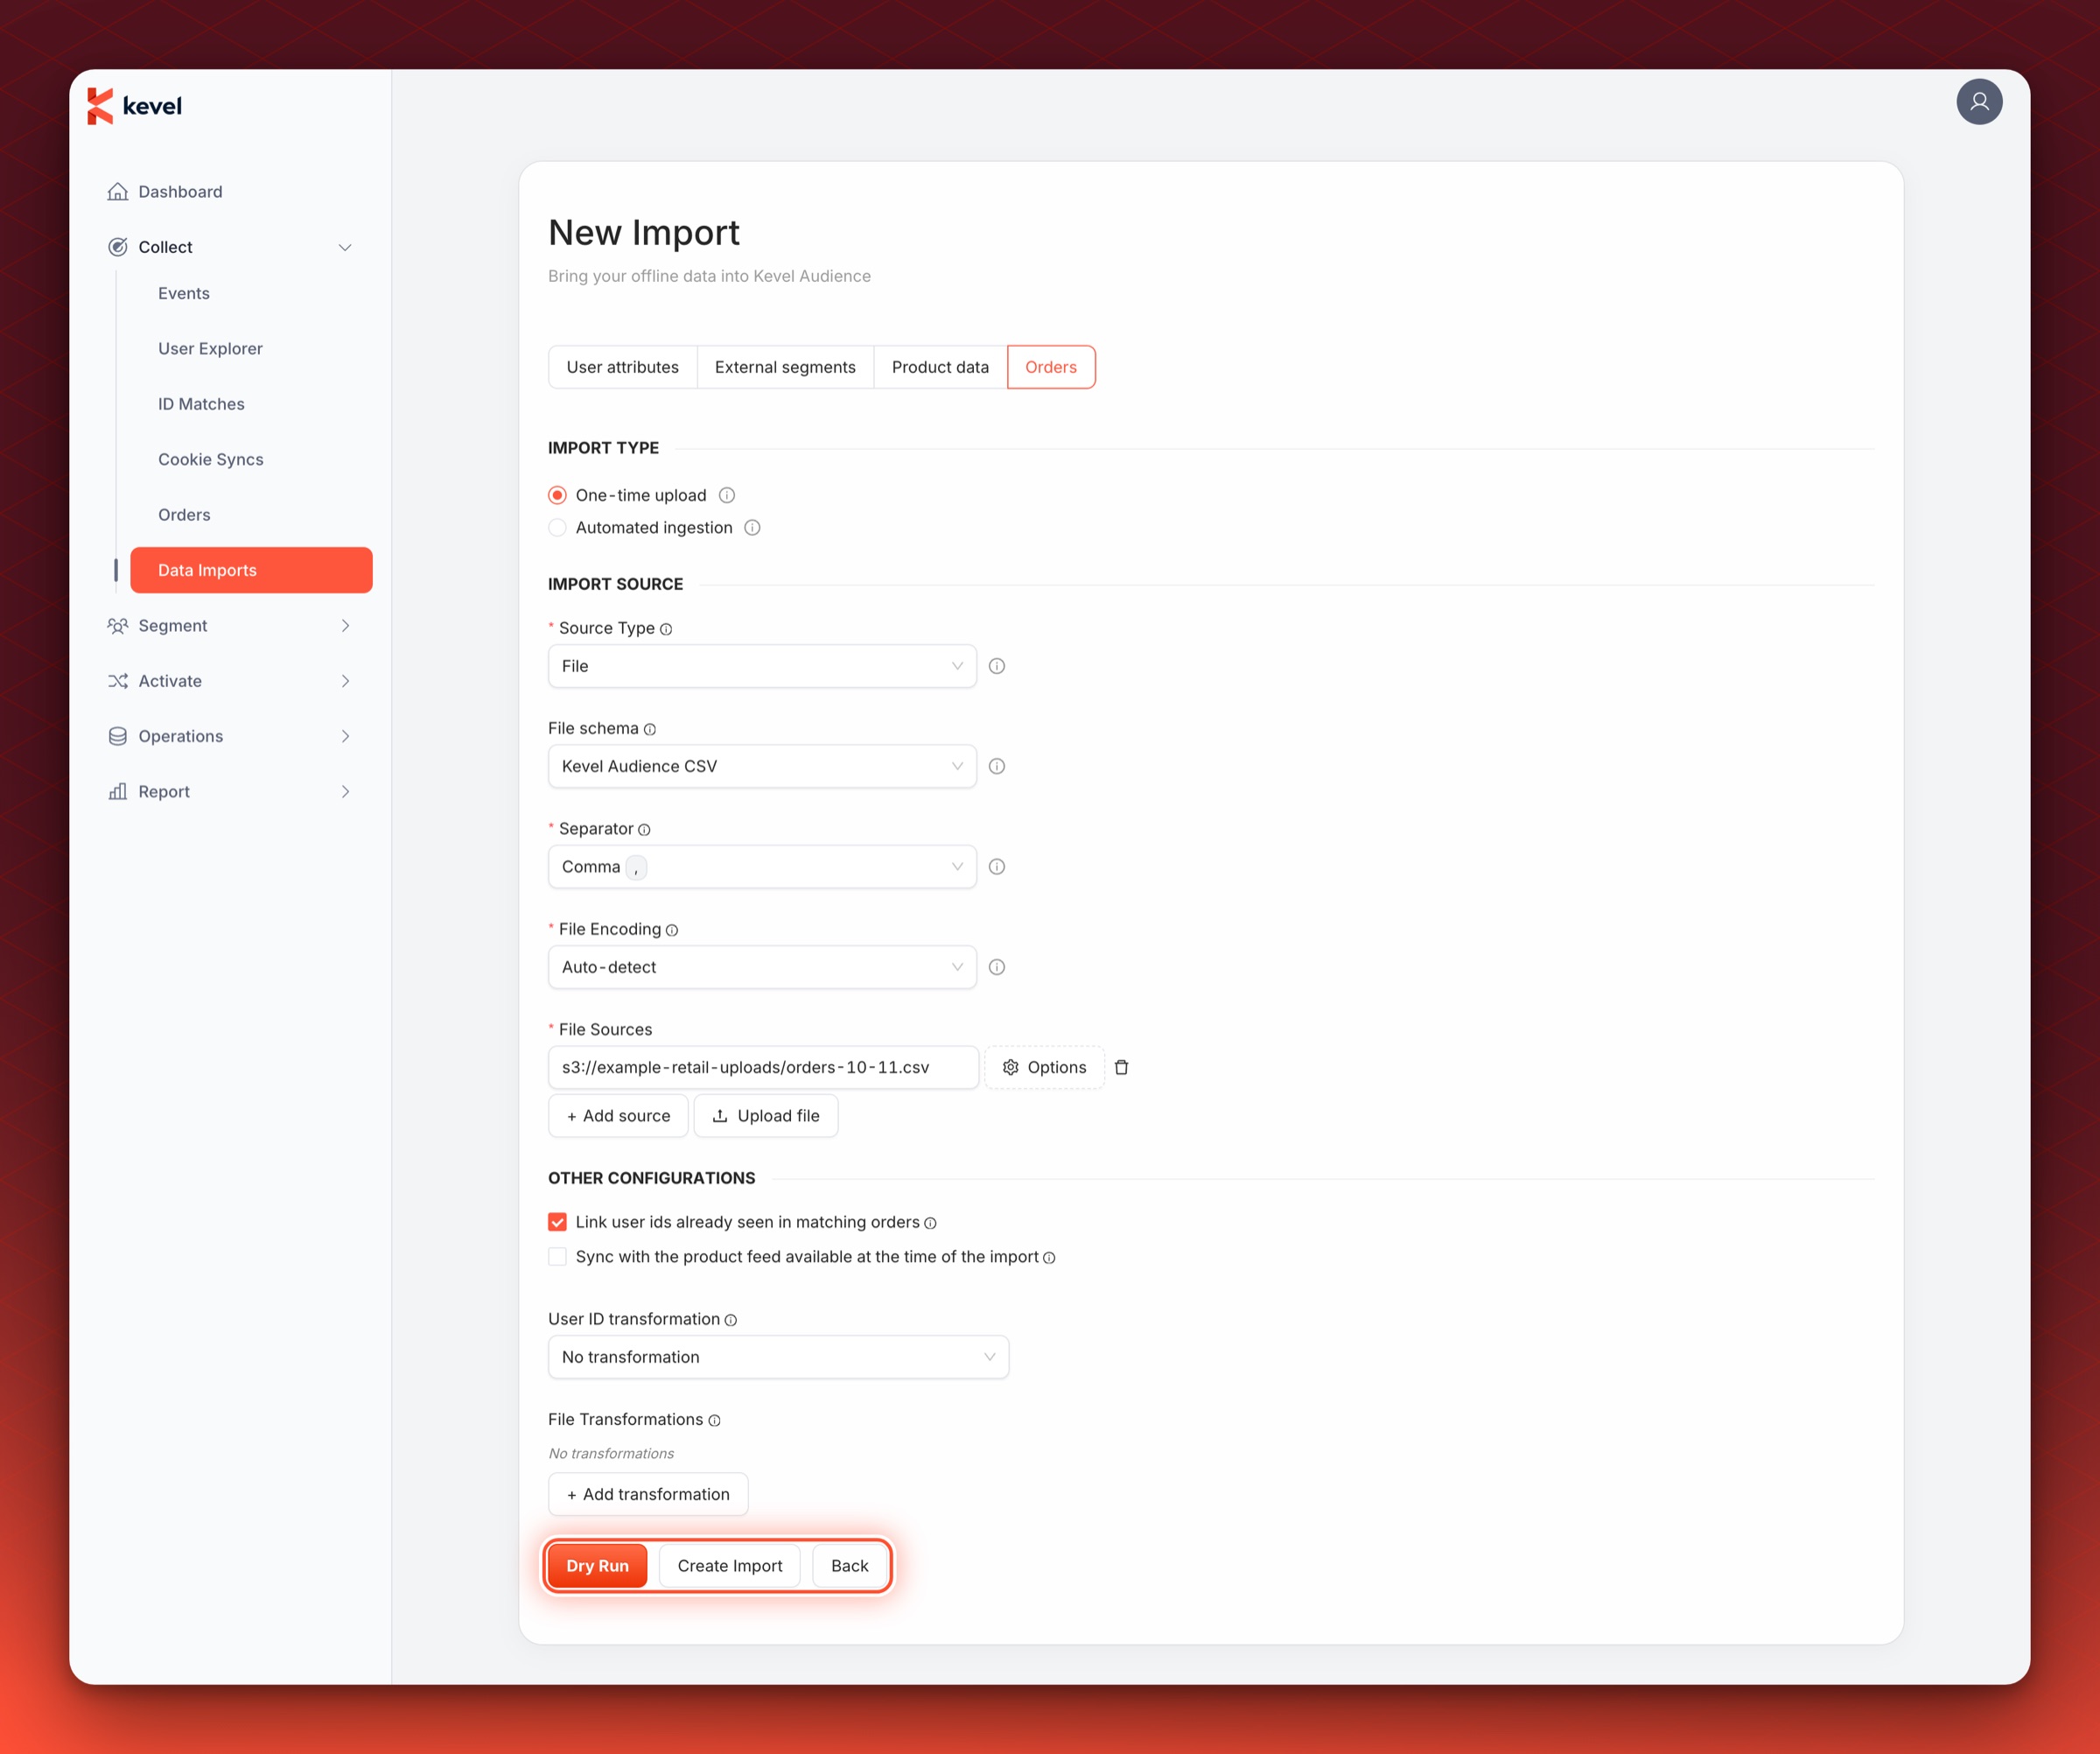
From the dry run results, it is possible to begin the actual import with the same configurations by clicking "Clone and import".
Monitor the Import
Once an import is created, its status, progress and results are available in the History tab of the Data Imports area. See Monitoring Imports for what each status, warning and result means.
Advanced Configurations
Automated Imports
An import can run once or repeat automatically. In the import form, choose Automated ingestion to set up an automated import. An automated import requires a name. Whether the import is automated, its name and its frequency option cannot be changed after the import is created. To change them, create a new automated import. The sources and the remaining settings can be edited.
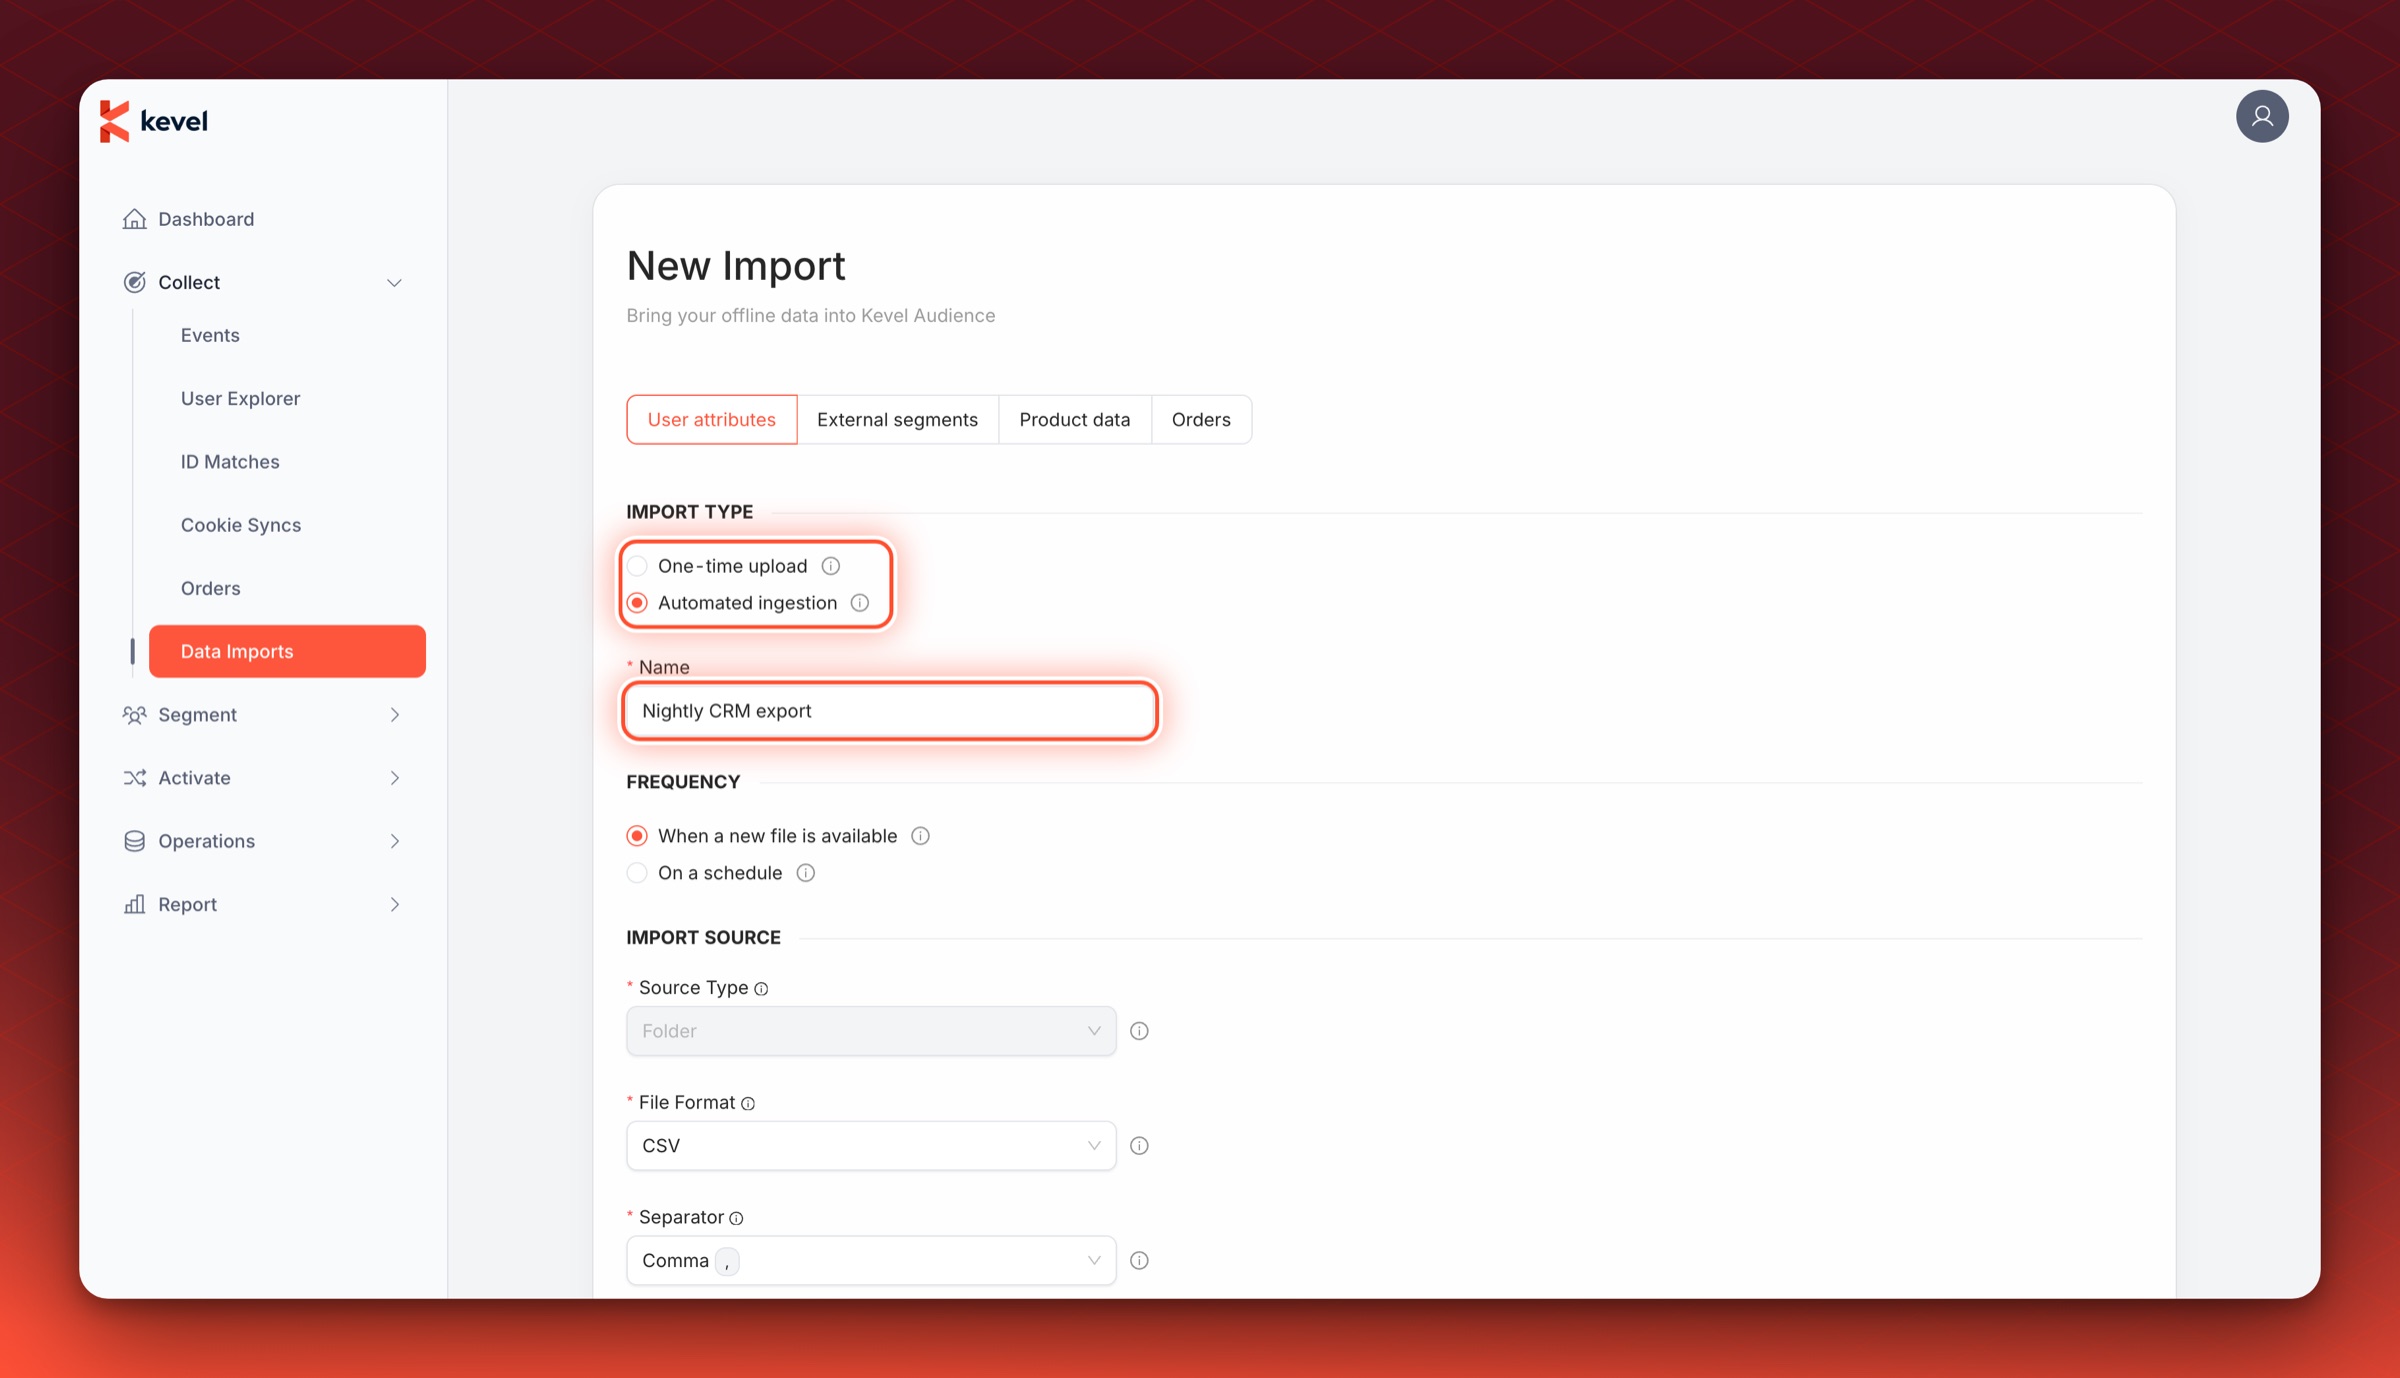
An automated import runs in one of two ways, chosen with its frequency option.
- A scheduled import starts an import at the configured time.
- A file detection import starts an import when new files are detected in the import sources.
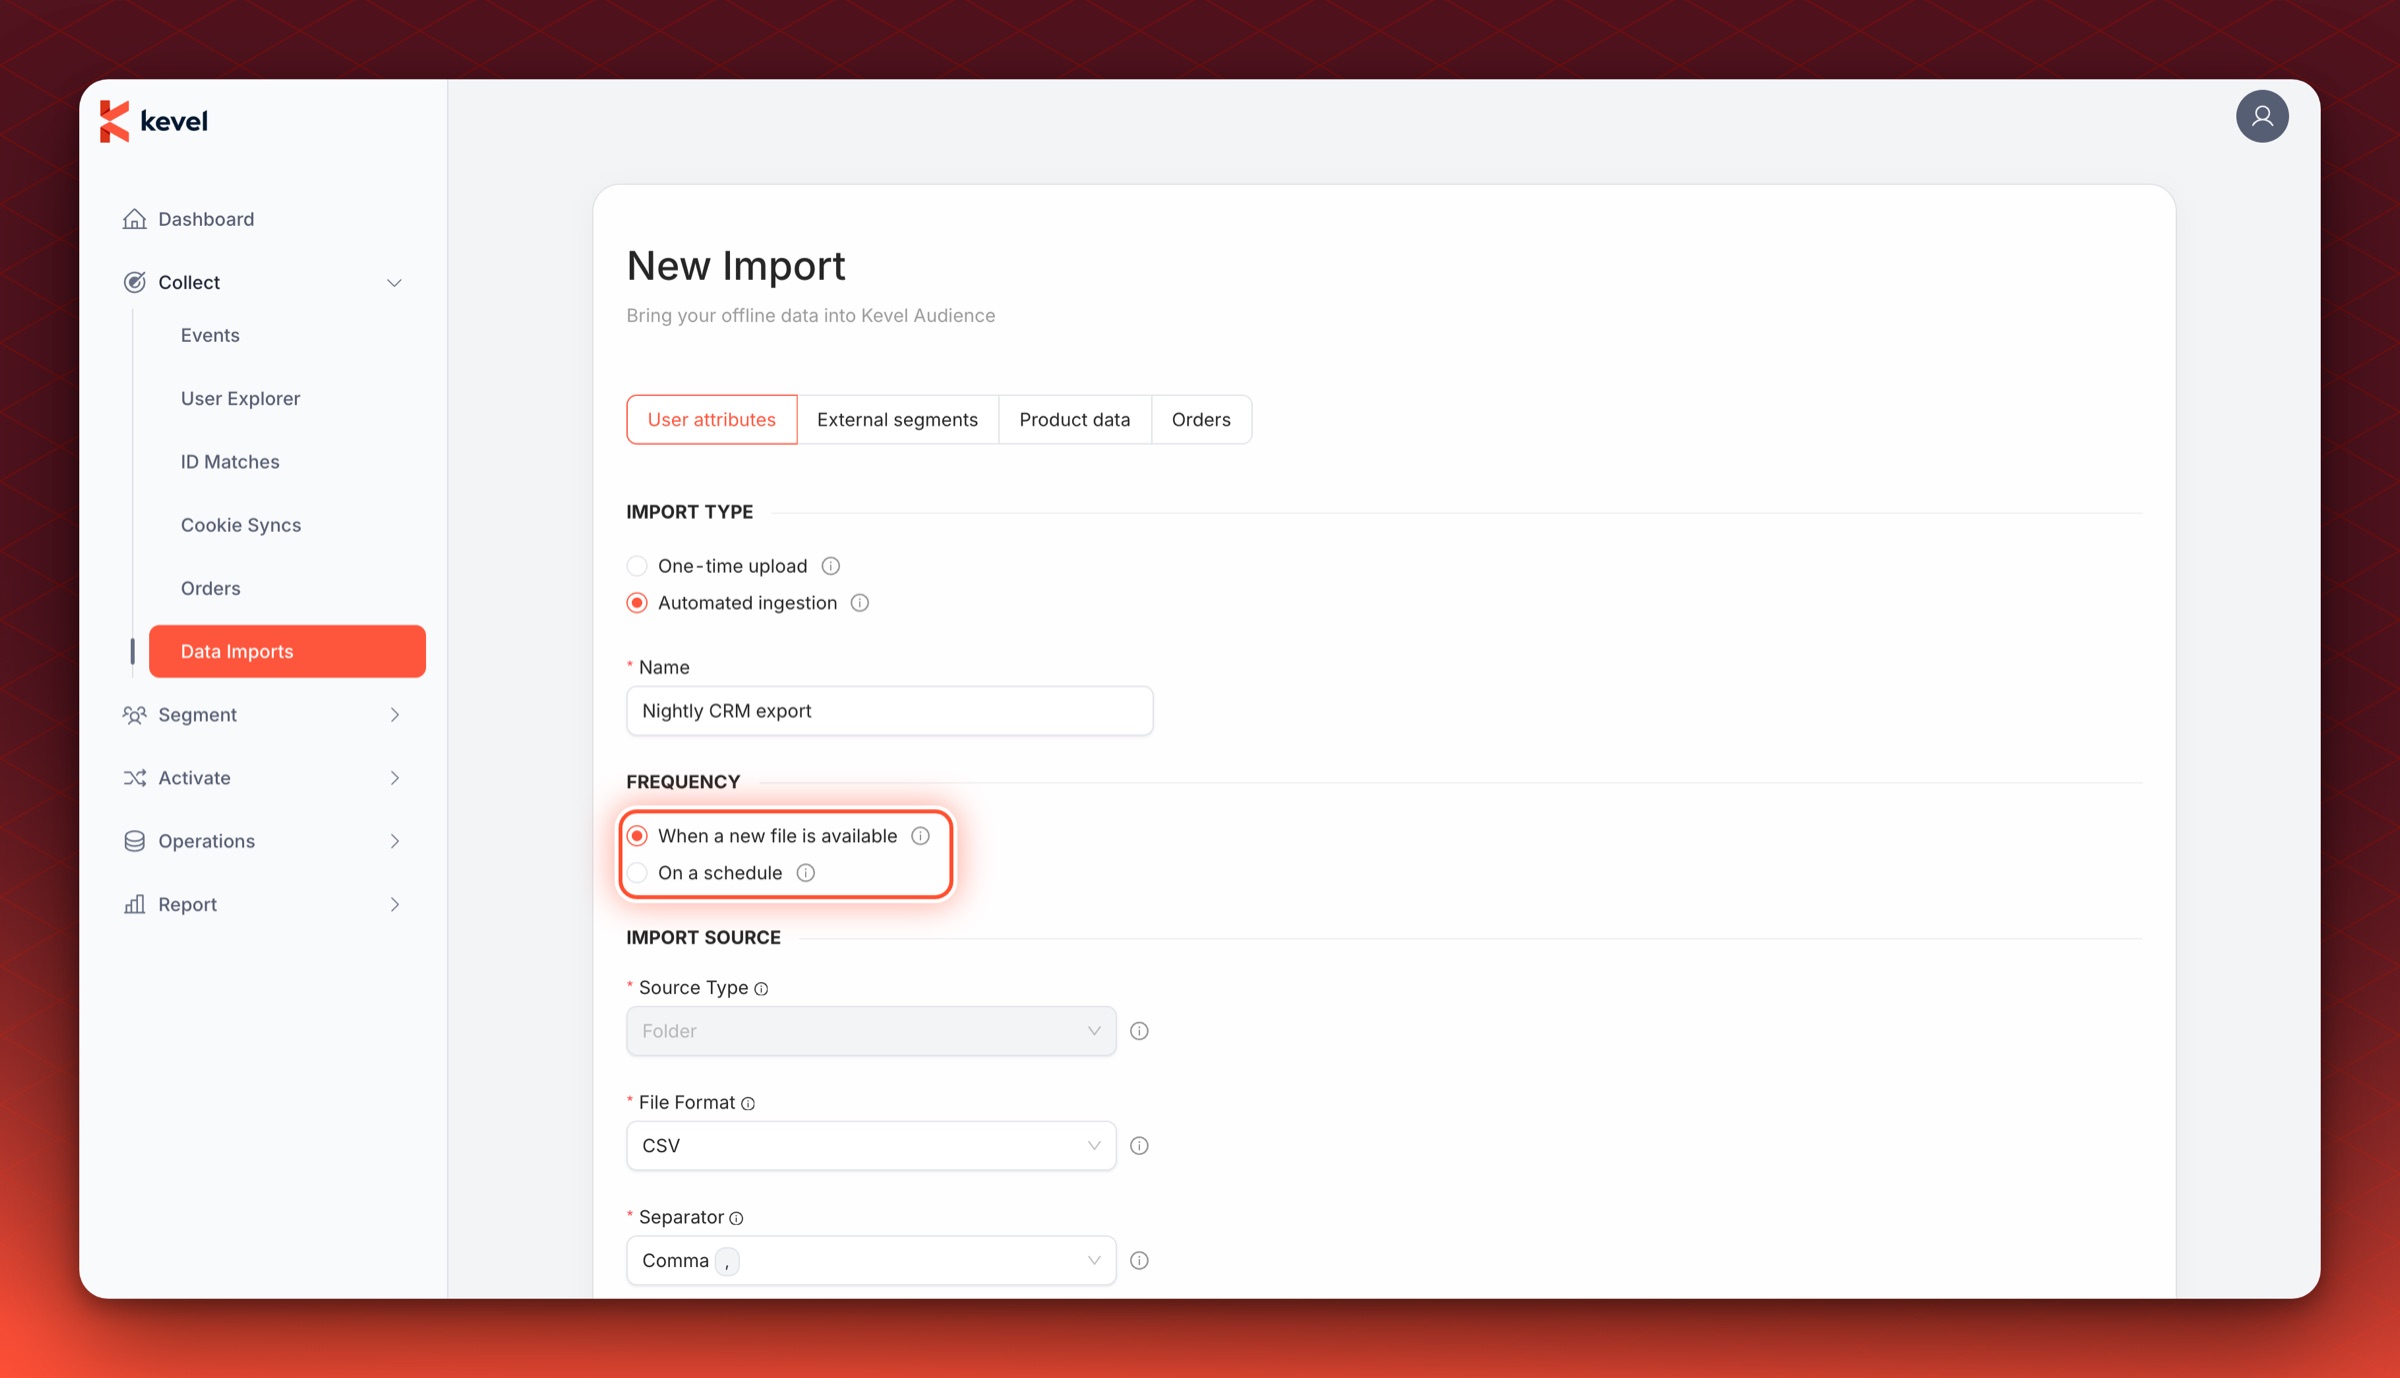
The two options differ in the following ways.
| Scheduled import | File detection import | |
|---|---|---|
| Starts an import | At the configured time | After a check finds at least one new file |
| Sources | Files or folders | Folders only |
| Creates an import when there is nothing new | Yes, an import is created at every run | No |
| Where it is listed | Scheduled imports tab | File detection imports tab |
For both options, if an import triggered by an automated import is still queued or running when the next trigger arrives, the new trigger is skipped.
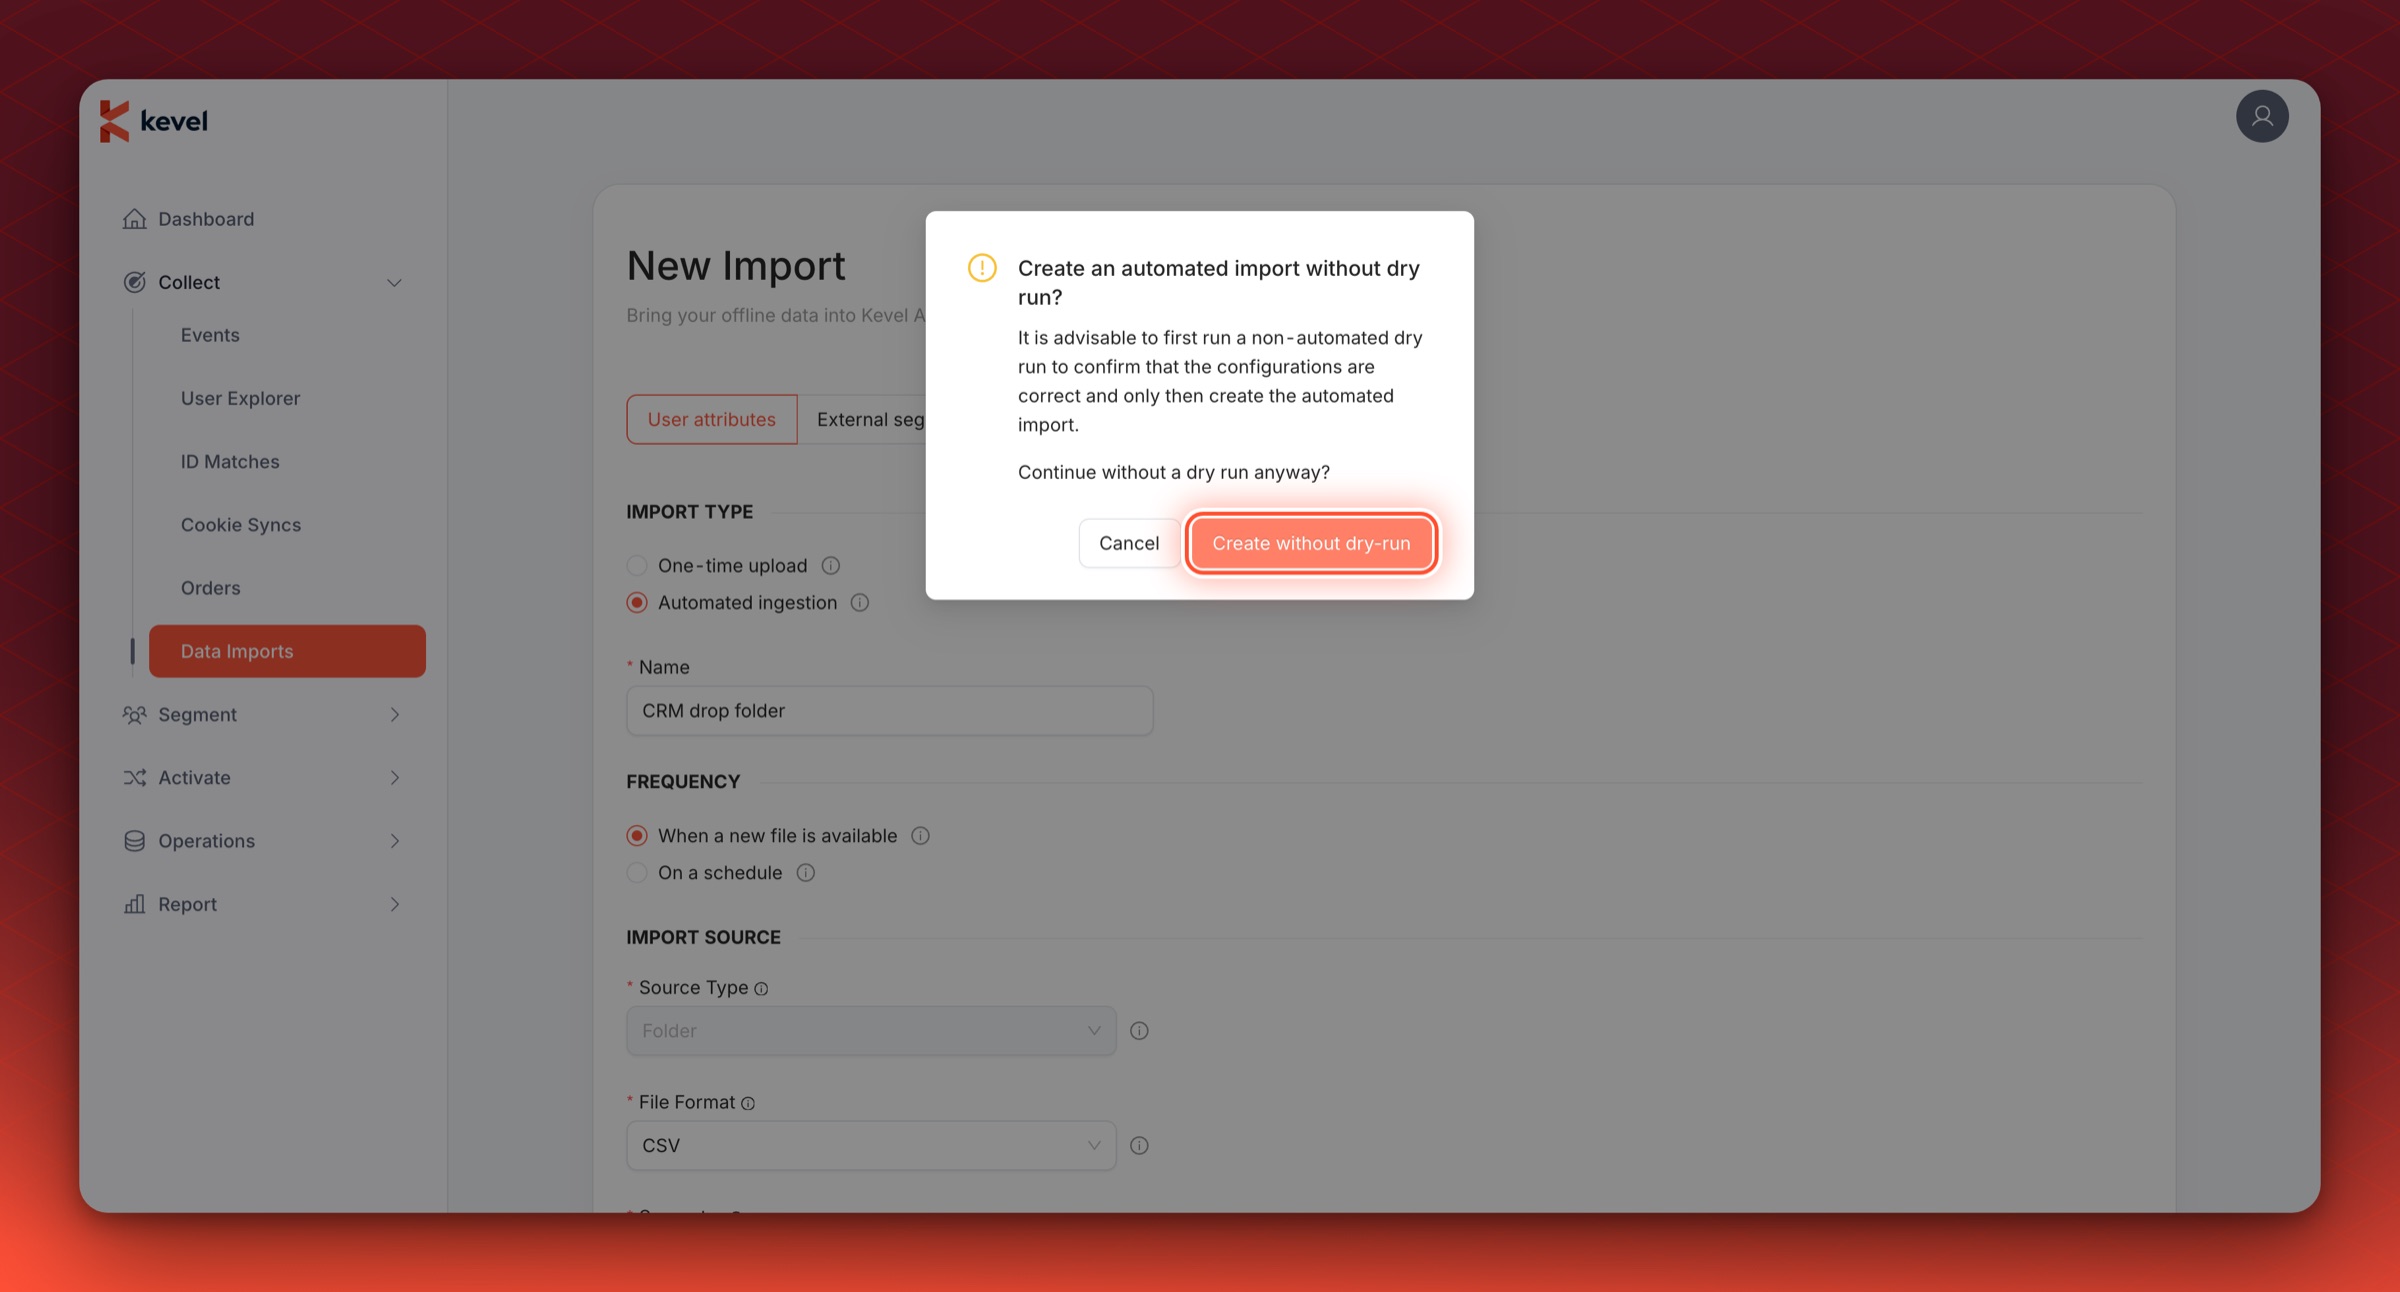
A dry run cannot be created for an automated import. To test the configuration first, run a one-time dry run, then duplicate it from its results page into a new import and choose automated ingestion.
Creating an automated import asks for a confirmation to continue without a dry run.
Scheduled Imports
For scheduled imports, the schedule can be specified according to years, months, weeks, days and hours. The schedule can be built by choosing appropriate values on the dropdown boxes, and the resulting description is displayed below. A schedule can run at most once a day. All dates and times are in UTC timezone.
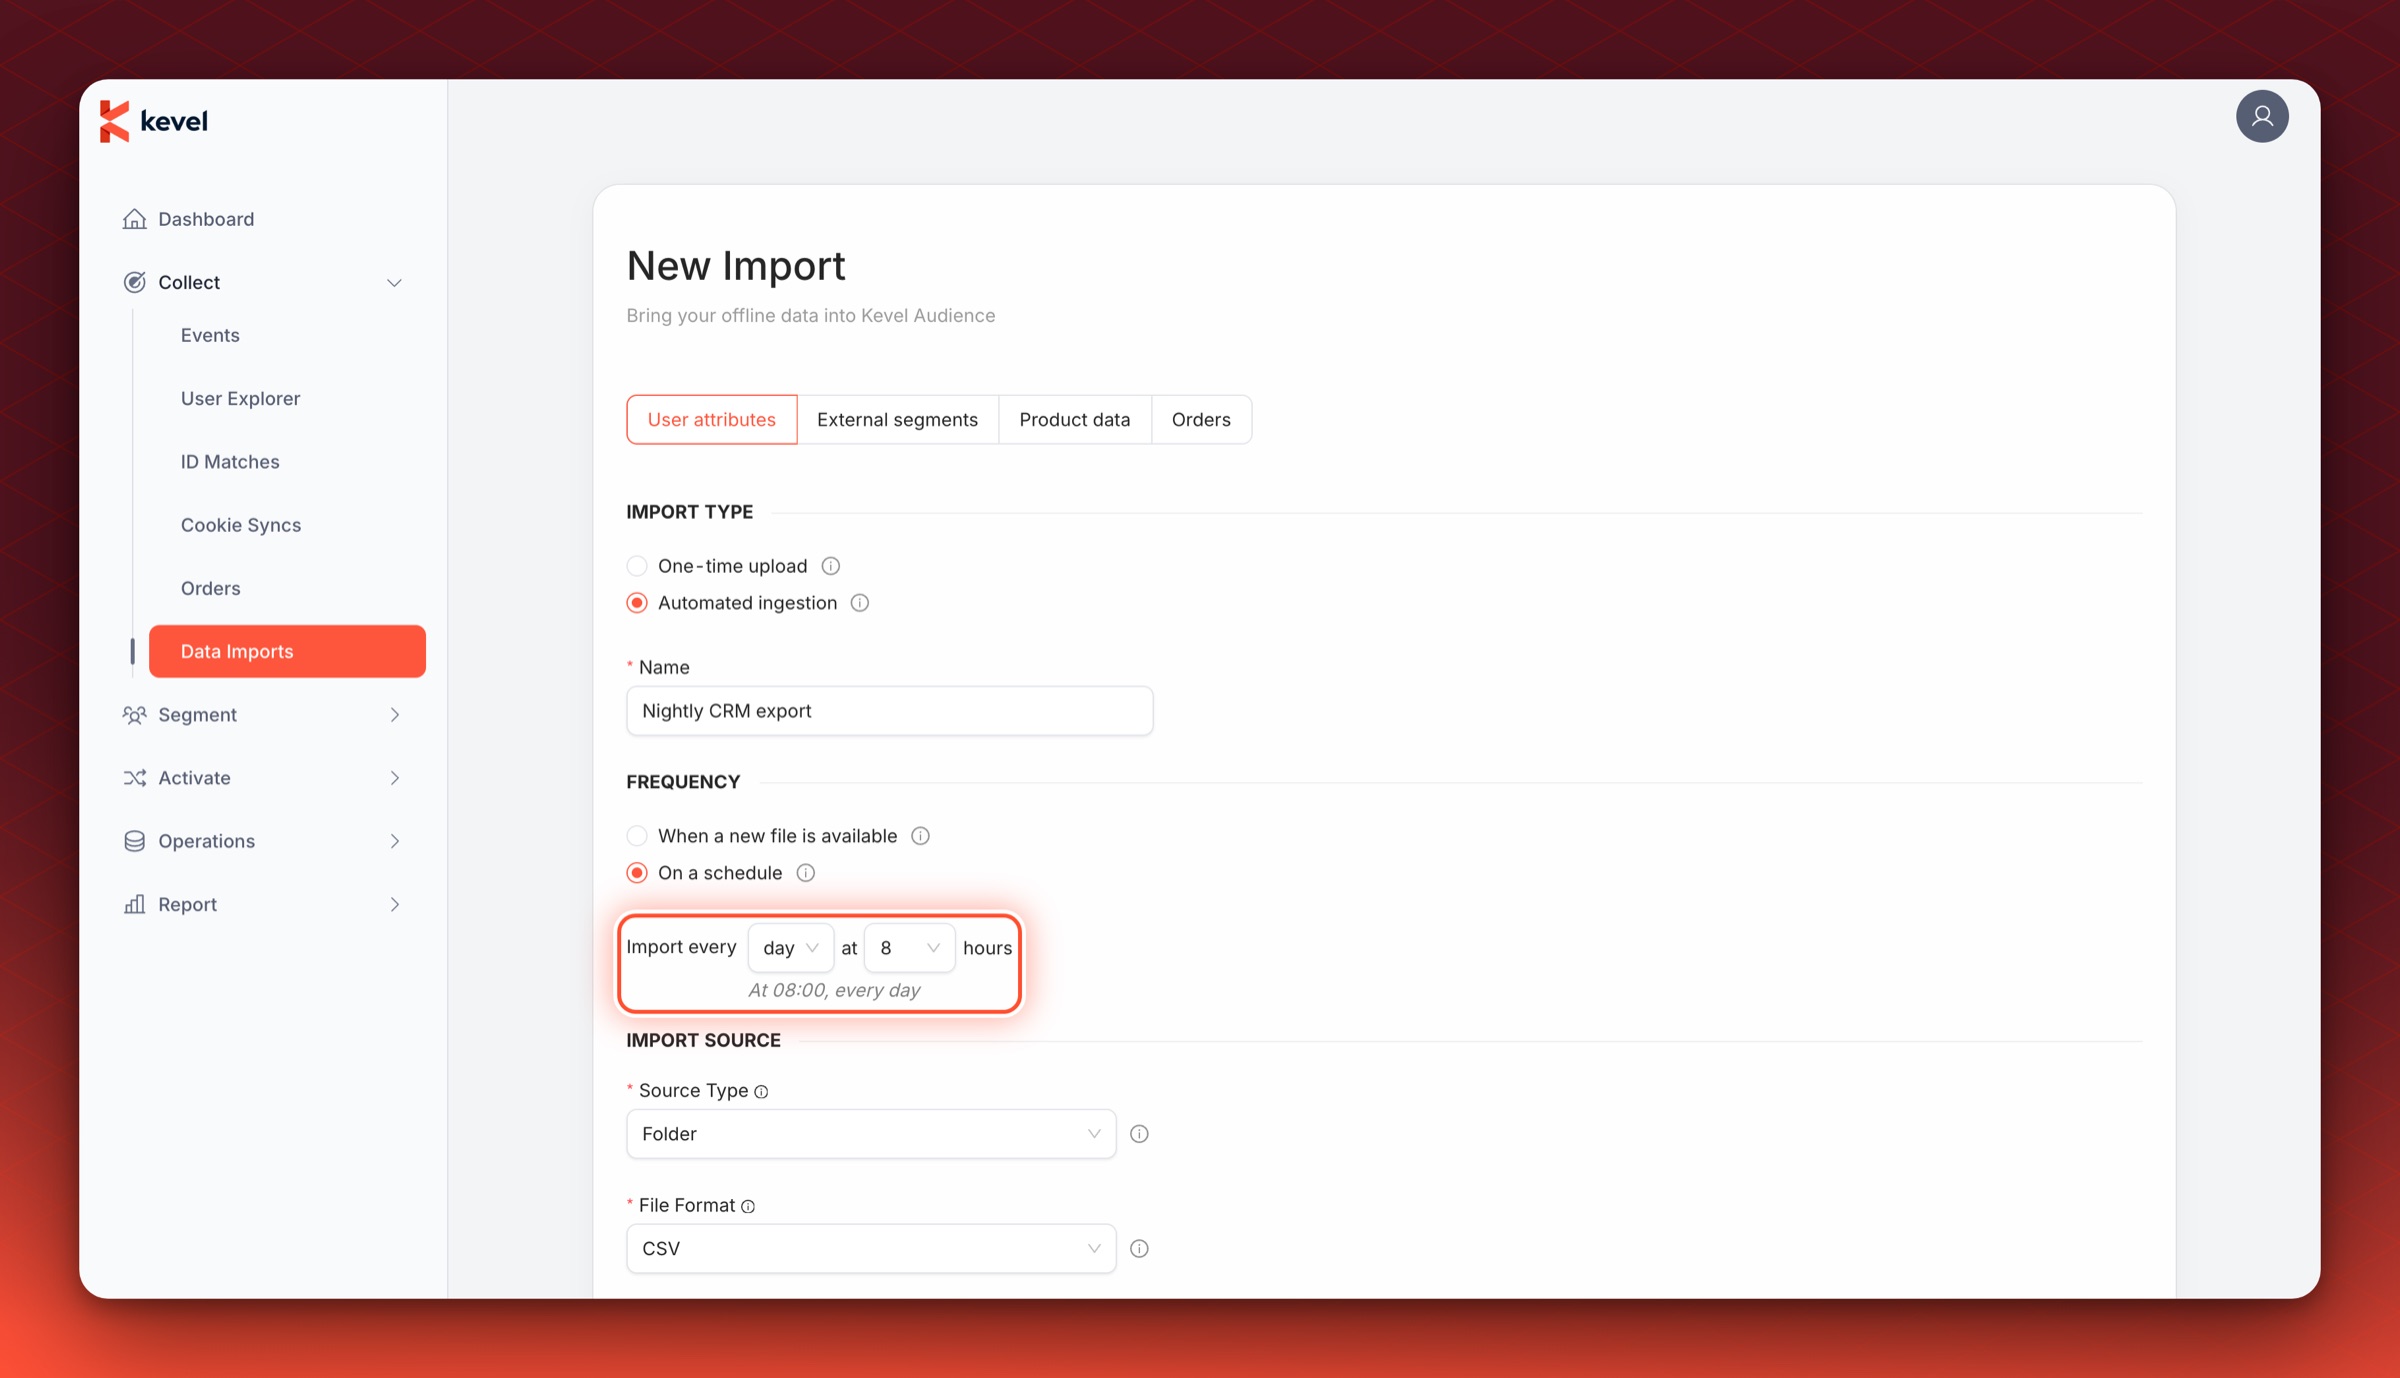
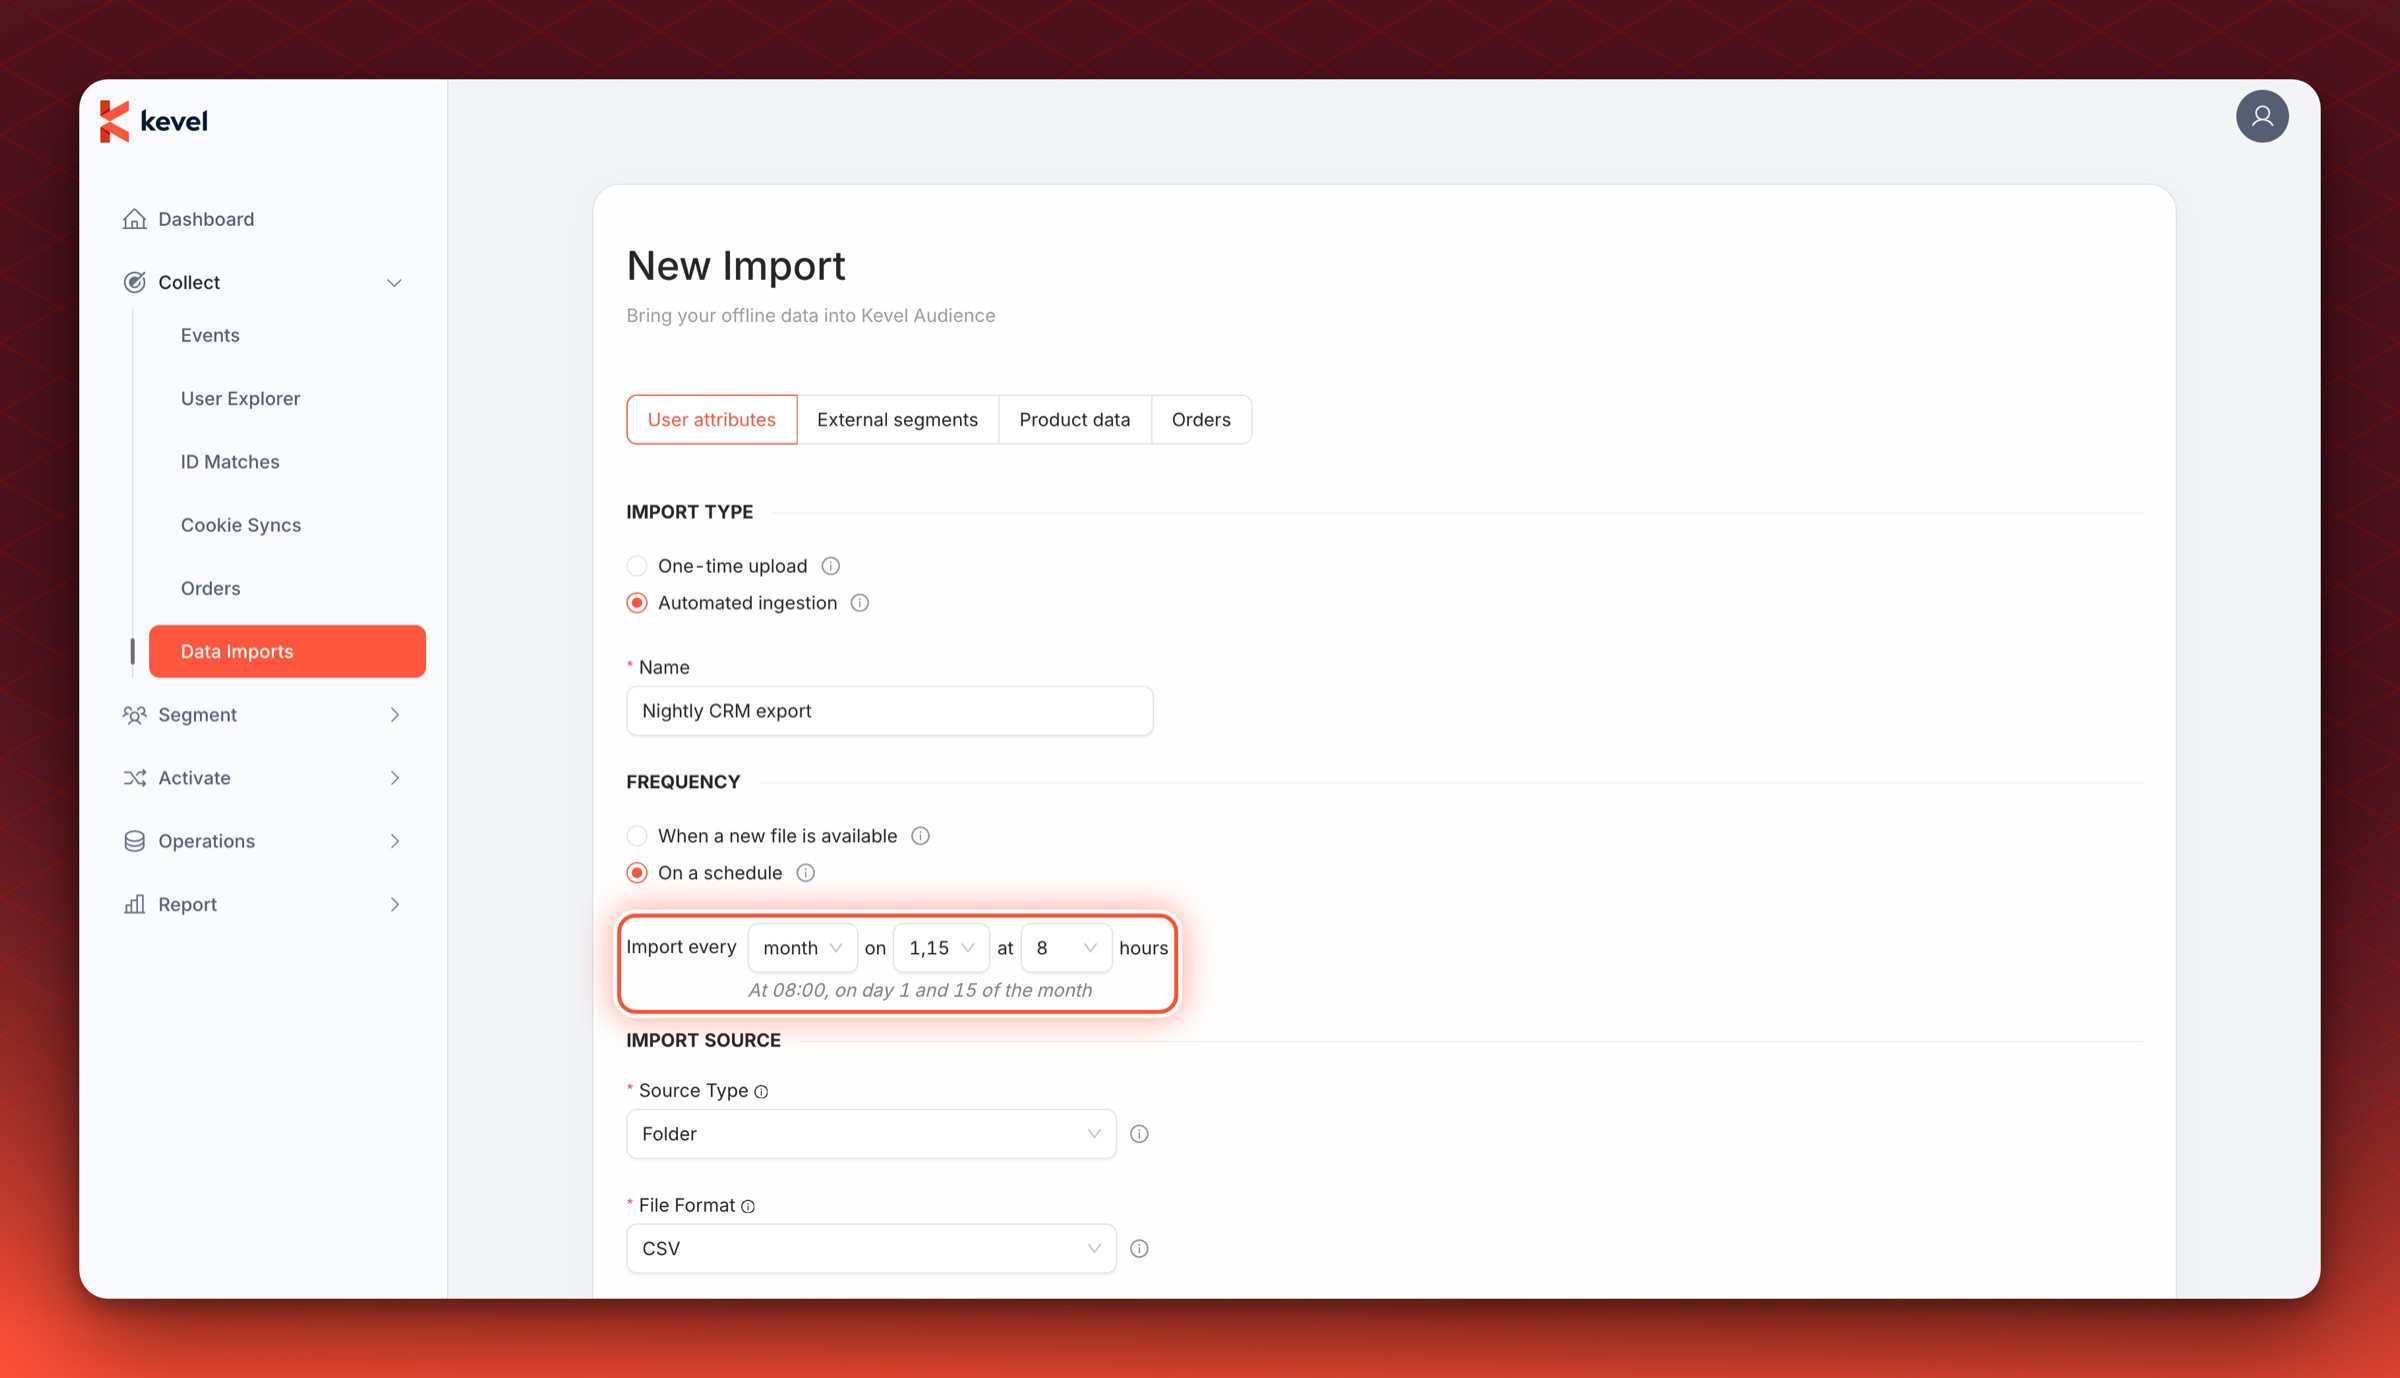
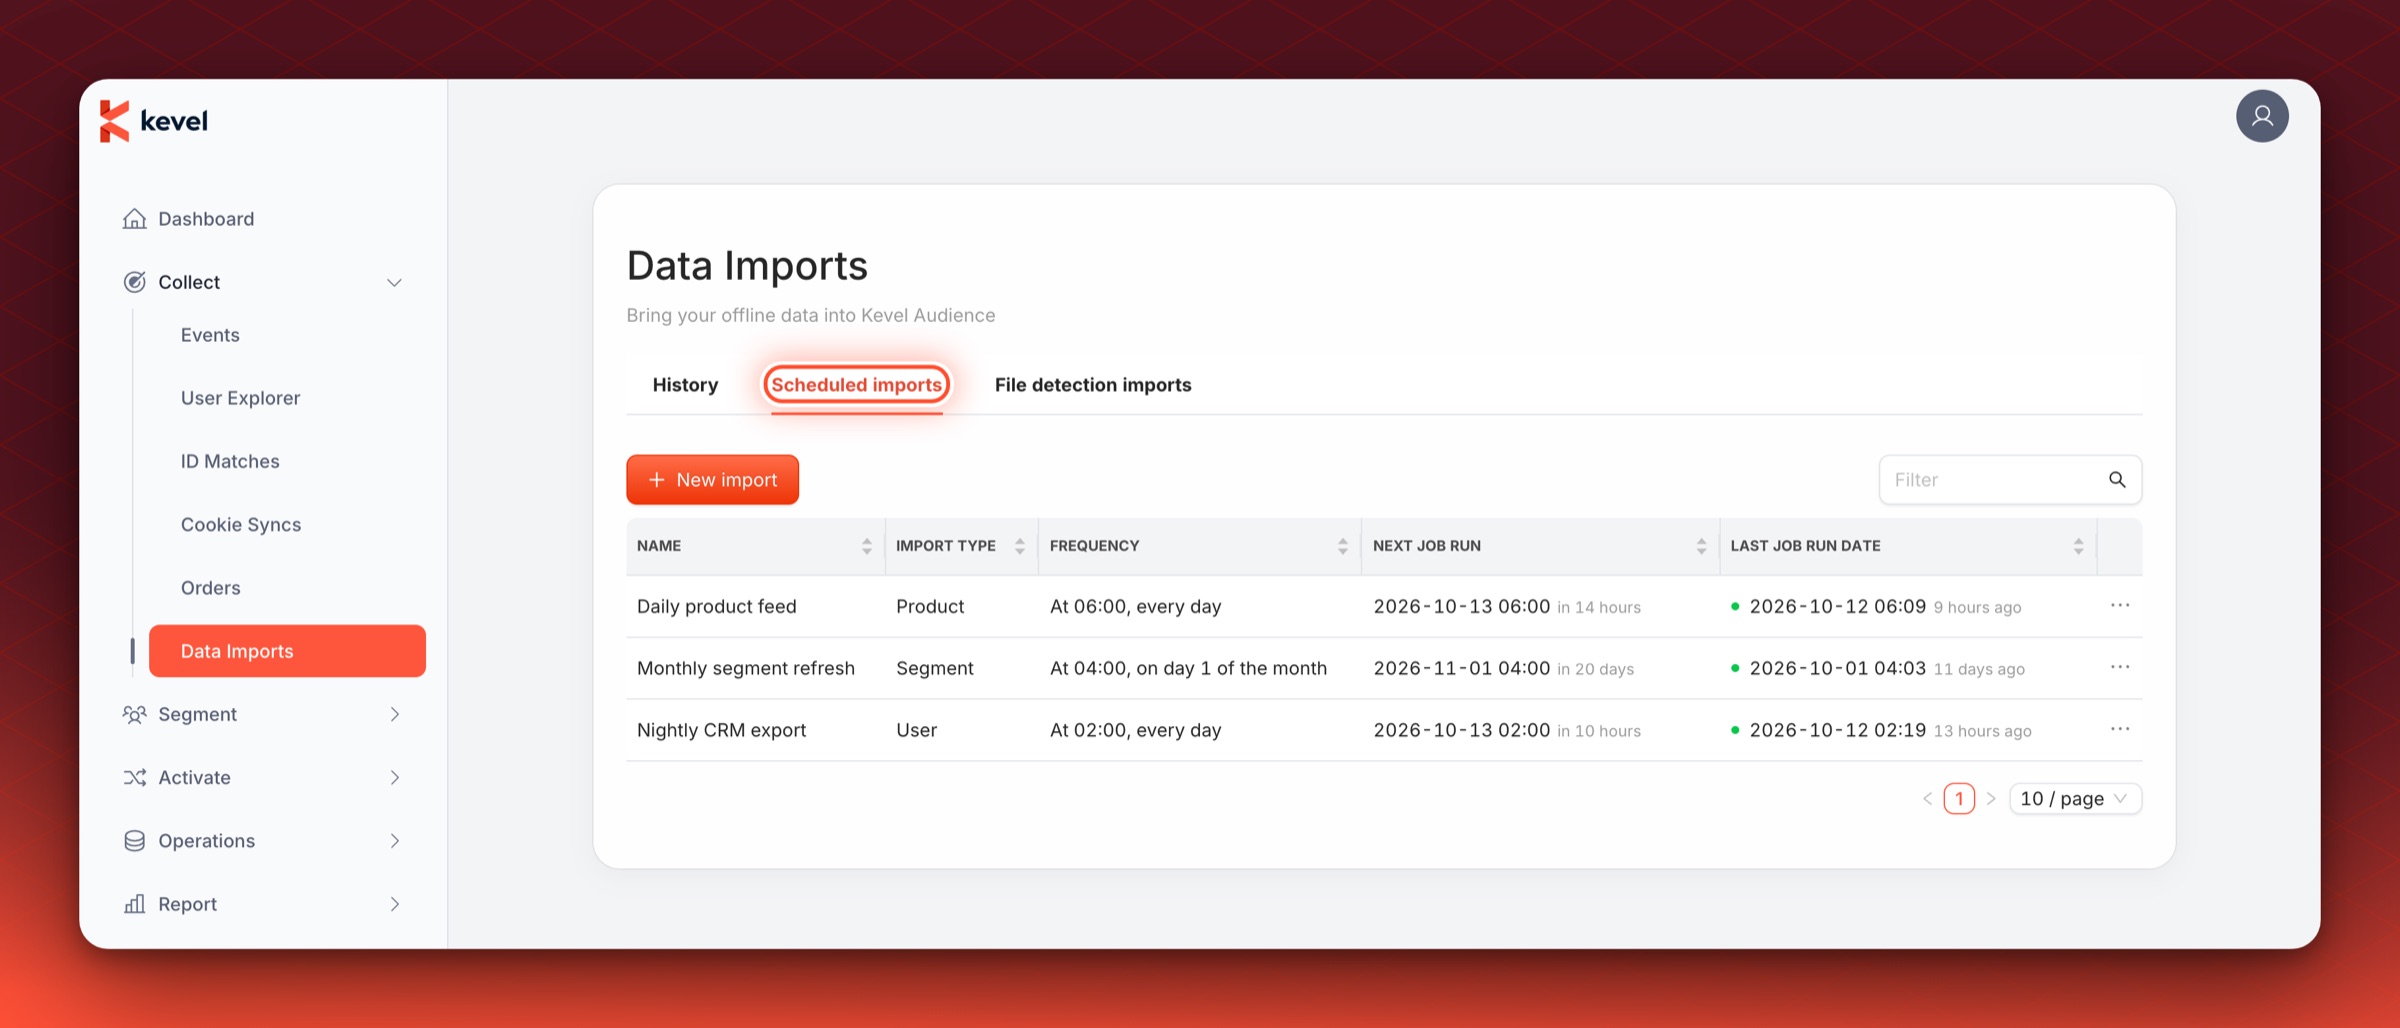
The Scheduled imports tab lists the schedules, with when each one runs next and when it last ran.
File Detection Imports
A file detection import watches one or more folders and imports files as they appear, without waiting for a scheduled time. It suits sources that receive new files at irregular times, such as a system that exports data whenever it has something new.
- Audience checks each watched folder regularly, so a new file can take a few minutes before its import is created.
- An import is created only when a check finds at least one new file. Checks that find nothing do not appear in the import history.
- A file is new when no earlier run of the same file detection import has imported a file with that name from that folder. See Folder Sources for how files are selected.
- Only folder sources can be used. The source type is set to folder and cannot be changed.
- If the previous import for the same file detection import is still queued or running, the check is skipped and the new files are picked up by a later check.
The File detection imports tab lists them with the date of their last run, which is the finish time of the most recent run that is no longer queued or running. Until a first run ends, there is no date.
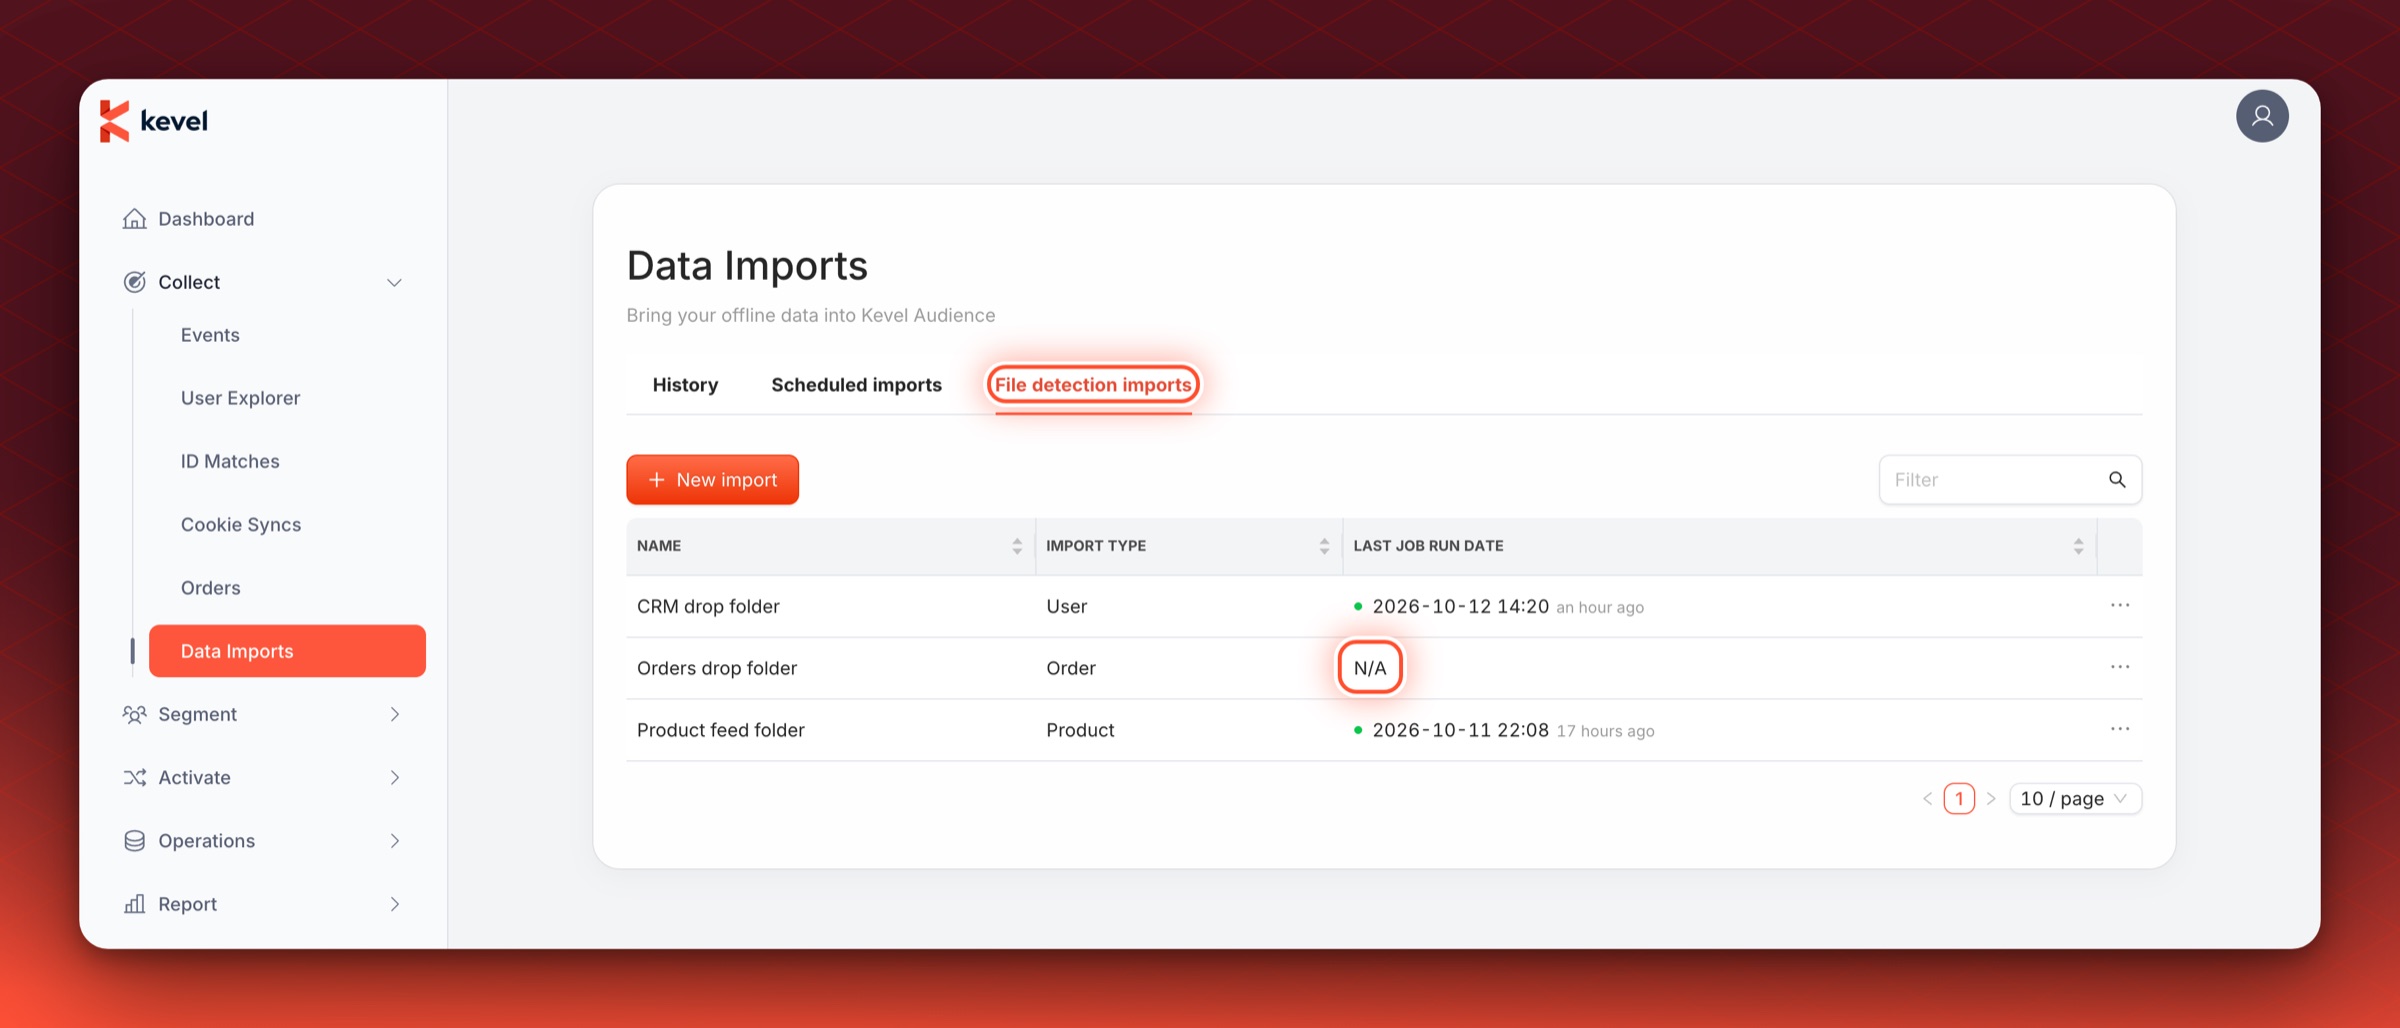
When Audience cannot read a watched folder, for example because access to the bucket or server was not set up, no import is created and no error is shown in the dashboard. A file detection import that still has no last run date when new files are expected should be checked against the troubleshooting steps.
File Sources
We support importing files with the following protocols: http, https, s3 and sftp. File imports can be run on-demand or scheduled; file detection imports are not supported for file sources.
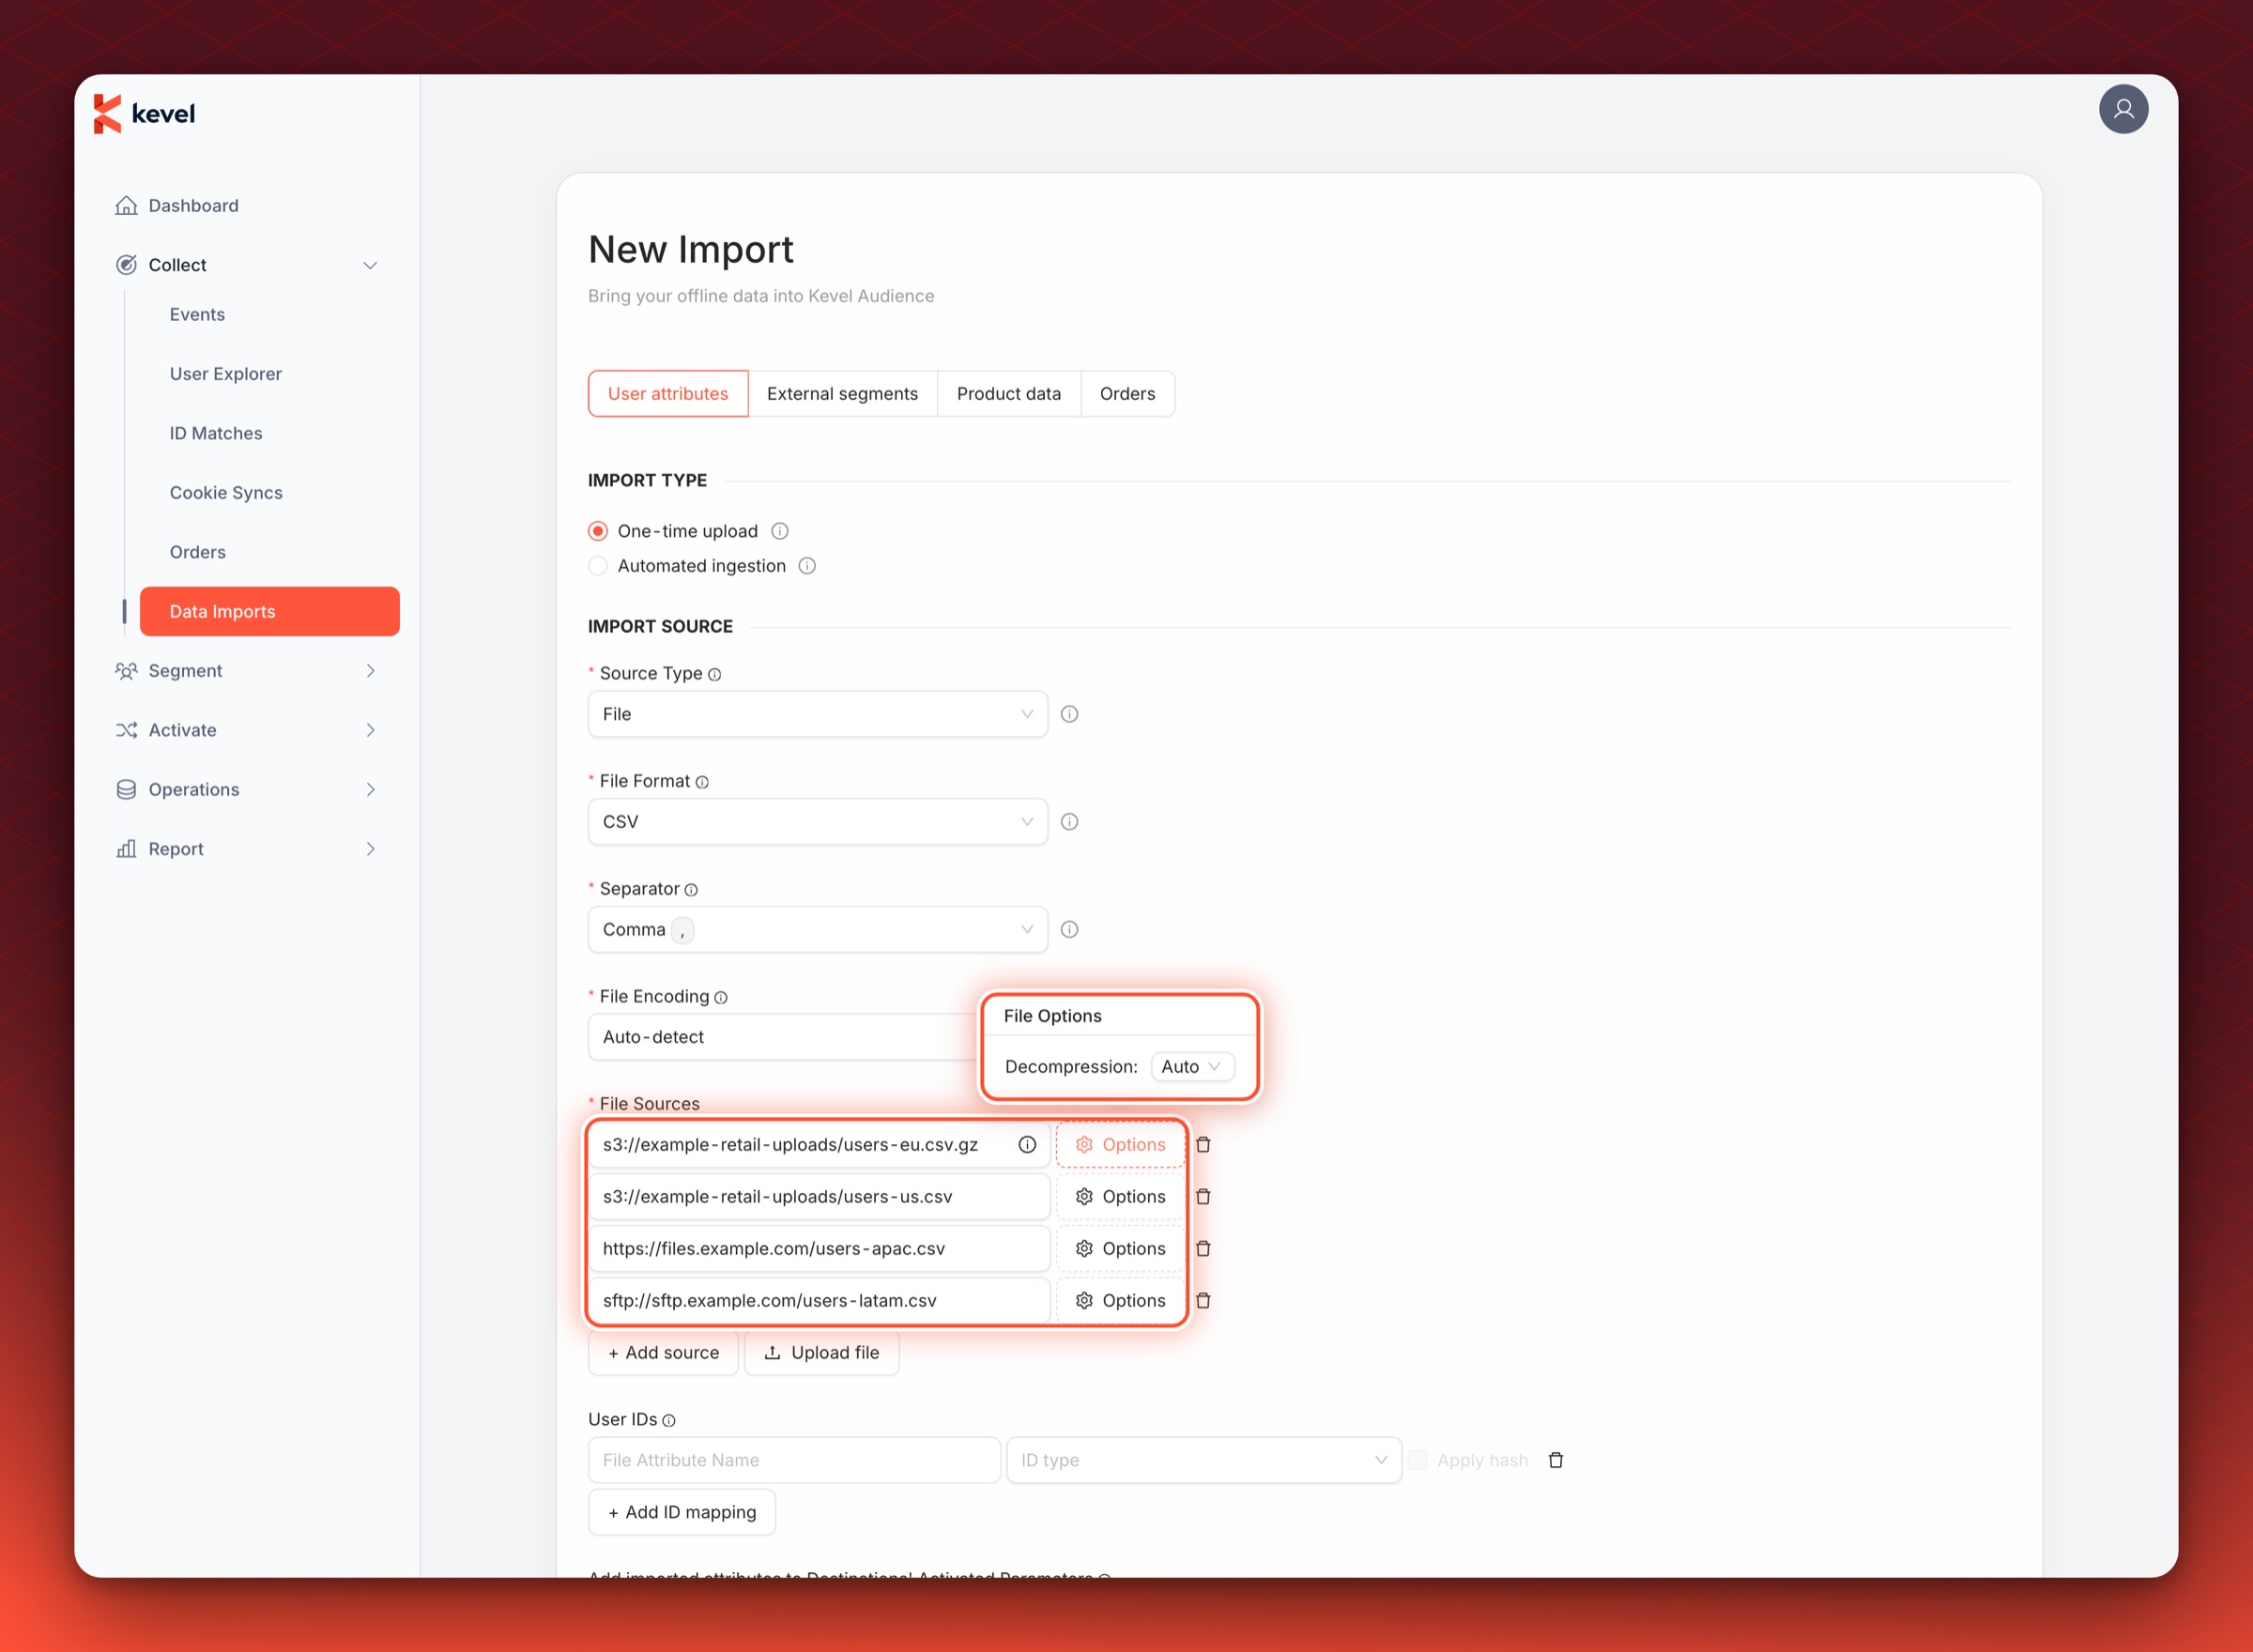
We have support for importing files compressed using gzip. By default, we'll try to detect the
necessary decompression method from the file name extension.
Users can upload files directly from their browser by clicking the Upload file button or by dragging files onto the page. This method is recommended for one-off imports, making it easier for users to quickly start testing Audience.
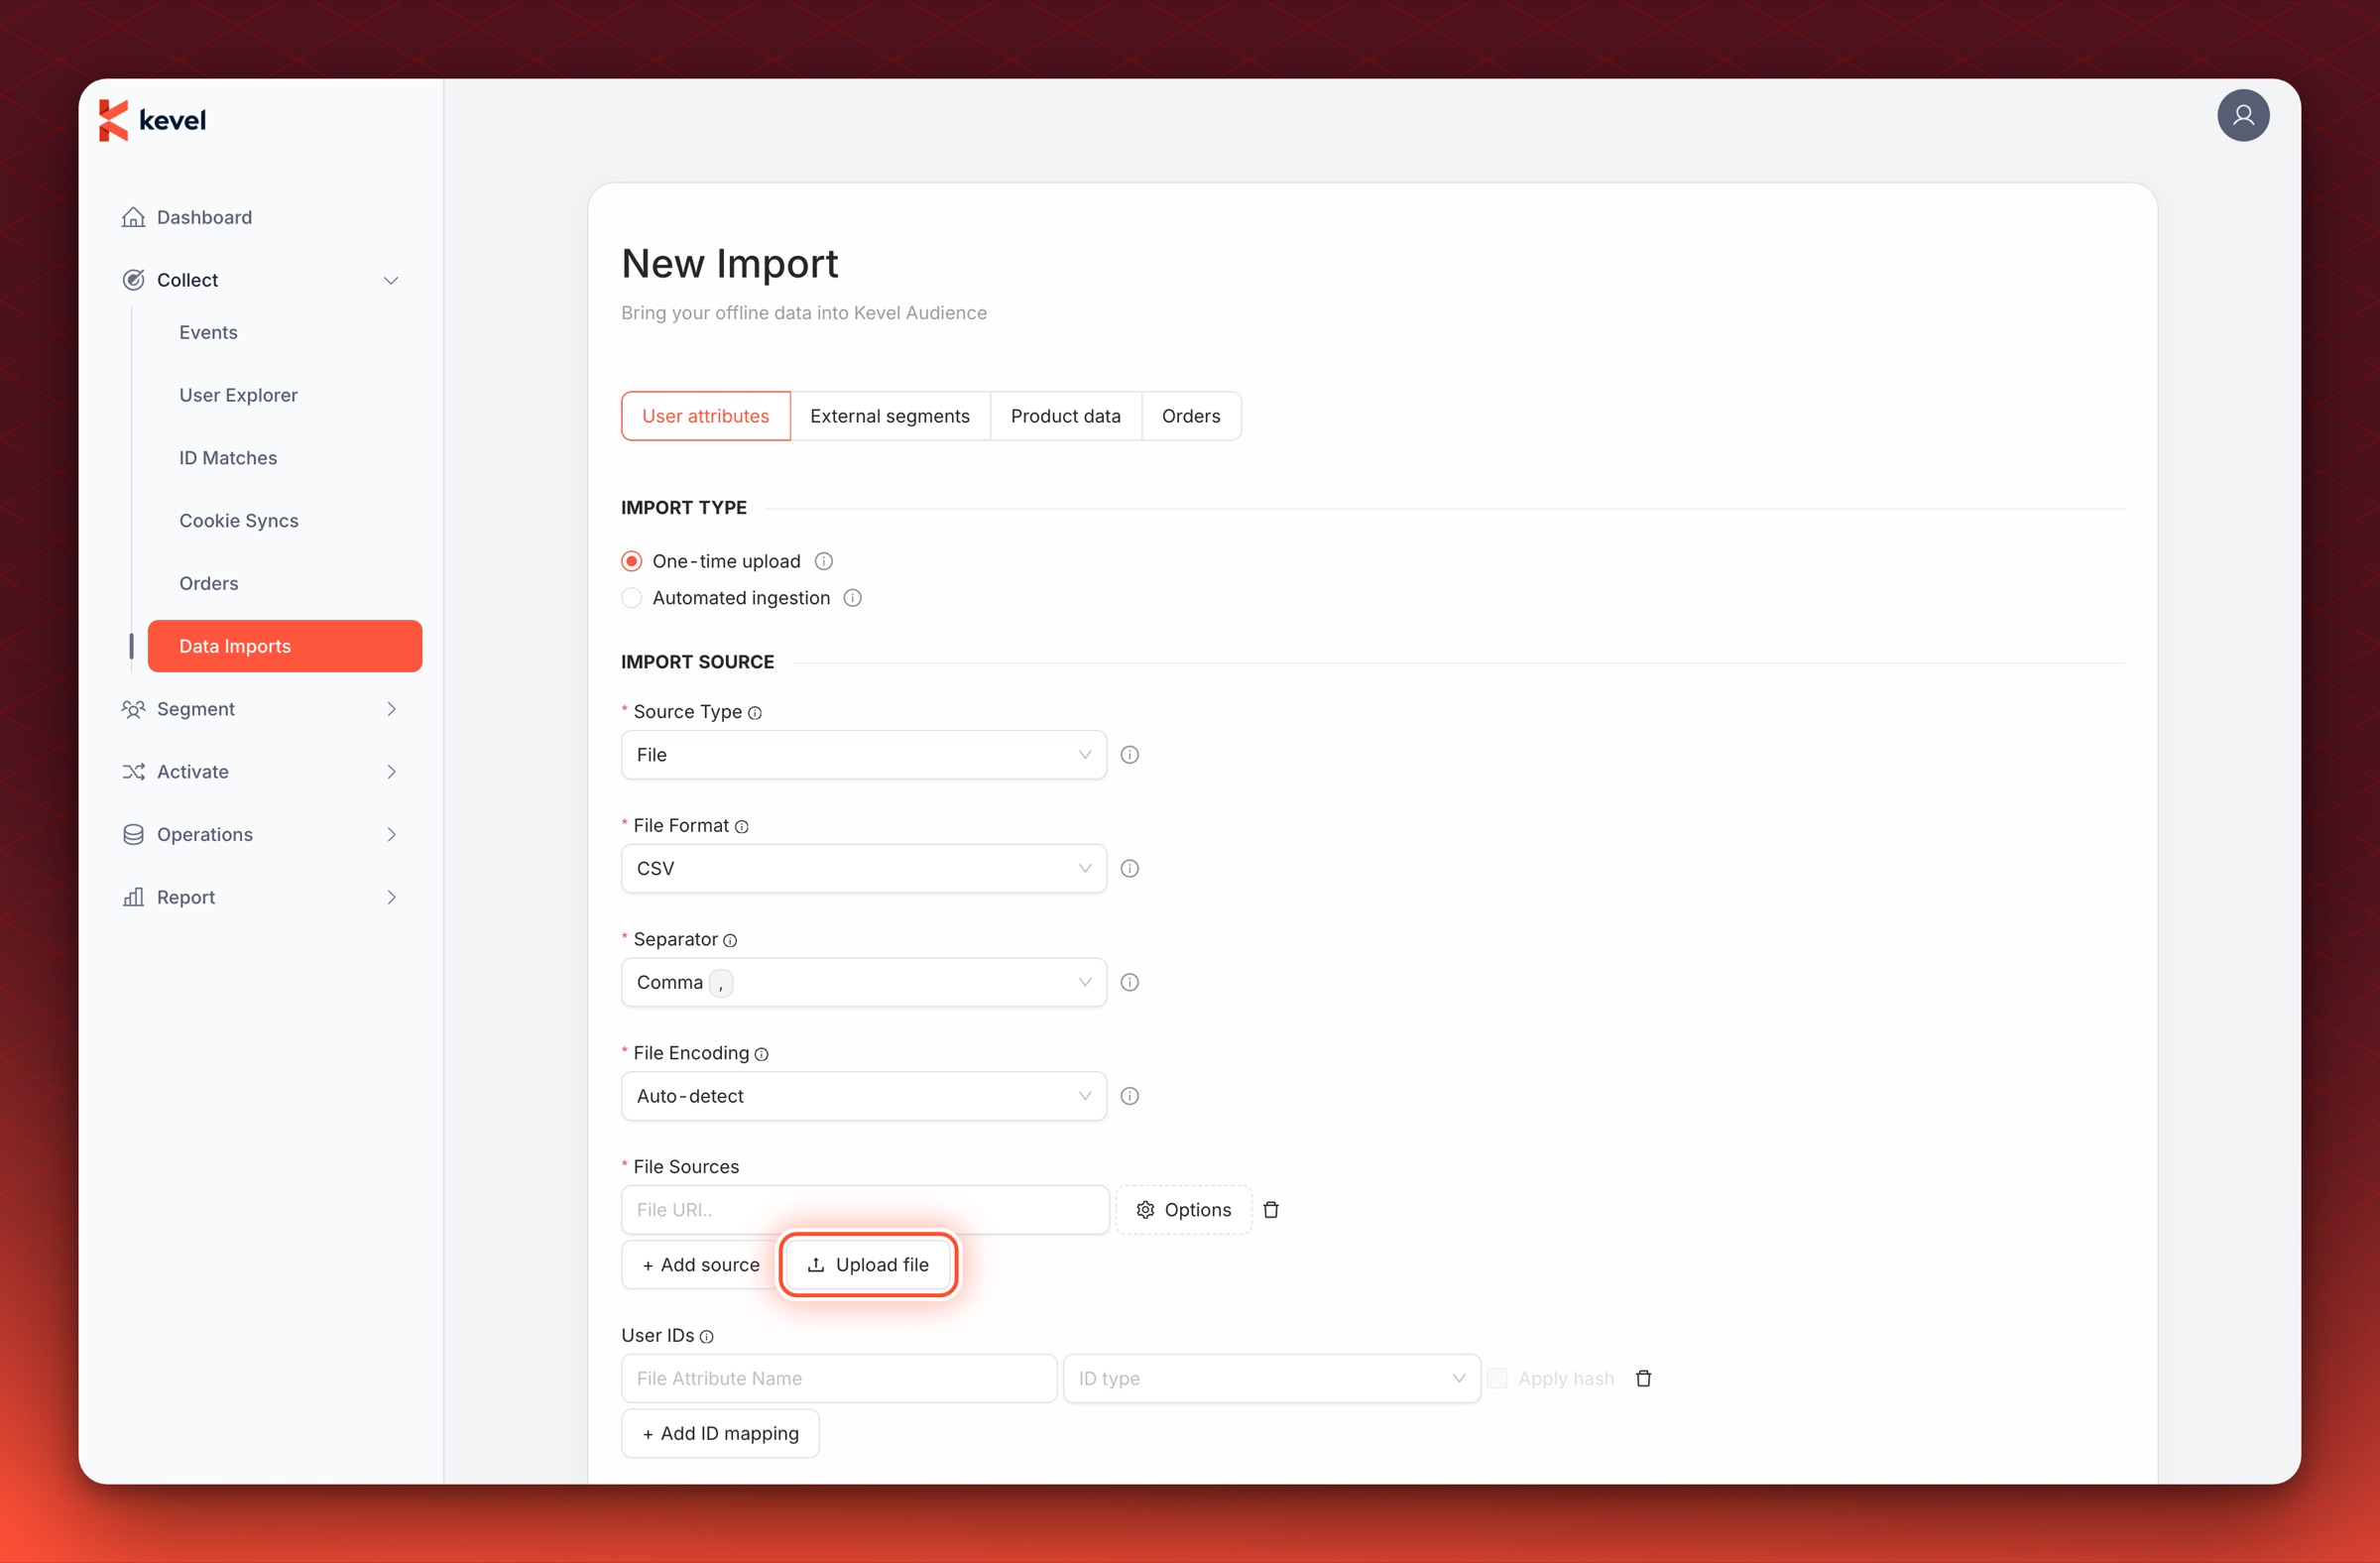
Files will be uploaded to a pre-created AWS S3 bucket for that specific Kevel Audience system. Uploading the files via the UI does not require credentials. These files will be deleted 1 month after being uploaded. For uploading files programmatically, Kevel Audience will supply the credentials for the bucket to the client during onboarding.
To use a s3 bucket other than the provided one or an authenticated sftp server, additional configuration is required.
See Accessing External Data Sources for details.
Folder Sources
Audience also supports importing files from folders via S3 or SFTP. Folder imports can be run on-demand, scheduled, or when new files are detected, making it easier to upload multiple files from the same location.
To set up a folder import, choose the folder source type and complete the details of each folder.
- Enter the folder URI using one of the supported protocols (
s3orsftp), for examples3://my-bucket/exports/. The URI must end with/. - Enter the file extension of the files to import, for example
.csv.gz. The extension must start with a., and a file is selected when its name ends with exactly that text. An extension of.csvdoes not selectreport.csv.gz. - Choose the decompression for the folder files: automatic, gzip or none. With automatic, files are decompressed when their extension ends with
.gzor.gzip. - Add more folders to import from more than one folder in the same import. Each folder has its own extension and decompression setting.
Shortly after the import starts, users can verify which files will be imported from each folder. The details page of the import lists the number of files for each folder, which can be expanded to show the file names. See Monitoring Imports for the other information on that page.
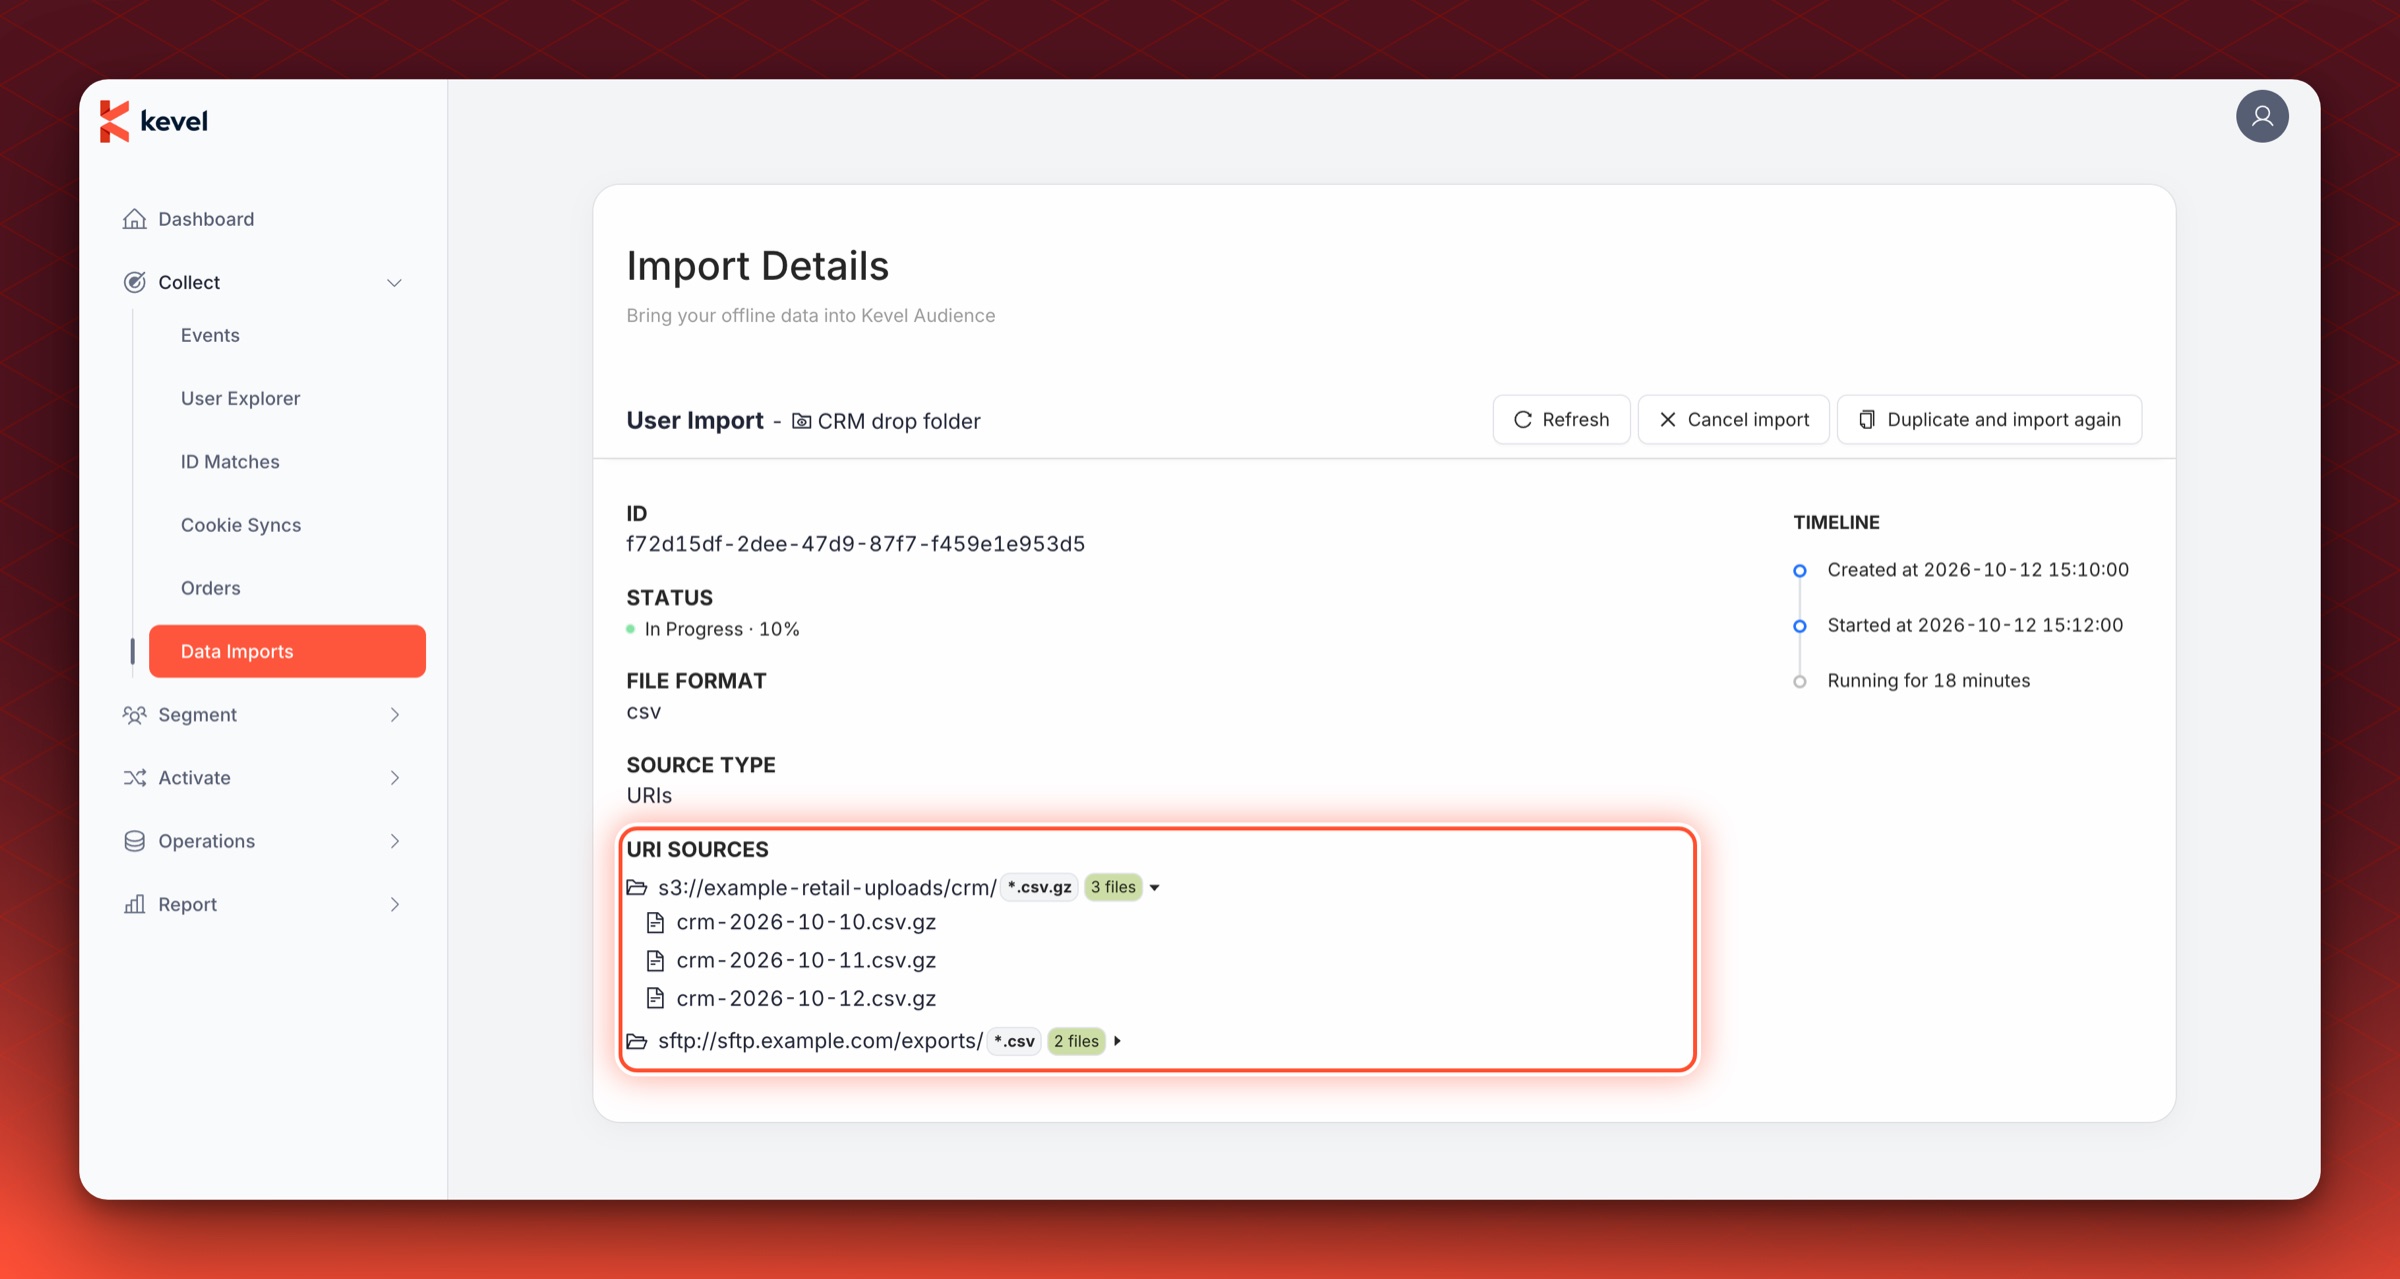
Folder imports follow these rules.
- Only files located directly in the folder are imported.
- Files are imported one after another, in alphabetical order within each folder, and the folders are processed in the order they are listed.
- Audience reads the folder and does not move, rename or delete any file in it.
- A one-time import, including a dry run, imports every file in the folder that matches the extension and the restrictions below. It does not take earlier imports into account.
- A scheduled import or a file detection import imports only the files that earlier runs of that same import have not imported yet, as described below.
In automated ingestion folder imports only files with a name that hasn't yet been imported will be considered on each import run. So, each time an import gets triggered, any files that were already imported in previous runs of that same automated ingestion import will be skipped.
A file is recognized by its name and the folder it is in. A file that reuses the name of an already imported file is skipped, even when its content is different. New data therefore needs a new file name, and a file should be complete before it is placed in the folder, because it is picked up the first time it is seen and is not read again after a change. A file whose import did not complete, for example because the import was canceled or failed, is considered new again in the next run.
Files in the same folder are distinguished by their names and imported alphabetically. Therefore, to guarantee that
files are uniquely named and imported in the expected order, it is recommended to choose a naming format based on the file's creation date.
Such a strategy will also allow users to easily determine which files can be safely discarded from the folder.
One possible approach is to prefix the name of the files with its creation date using the format
YYYYMMDDHHMMSS[-N], where N is an optional version number to distinguish files with identical timestamps
(e.g.: 20211006090000-1.csv, 20211006090000-2.csv, etc).
To prevent issues due to an unbounded amount of files, folder imports have the following constraints:
- Number of files: Maximum of 5,000 files per folder in each import run
- File age: Only files no older than 30 days are processed. File age is measured when the import runs and is determined by modified timestamp (mtime) for SFTP and last modified timestamp for S3. The date in the file name is not used.
Folder imports must comply with these limits. Files that exceed the age or count restrictions will be automatically excluded from processing. An import where every file is excluded completes with 0 lines. Moving older files to a different folder keeps the watched folder small.
For automated ingestion folder imports, files that are skipped due to the 5,000 file limit will be processed in subsequent runs, provided they haven't been deleted or exceeded the 30-day age limit in the meantime.
File Encodings
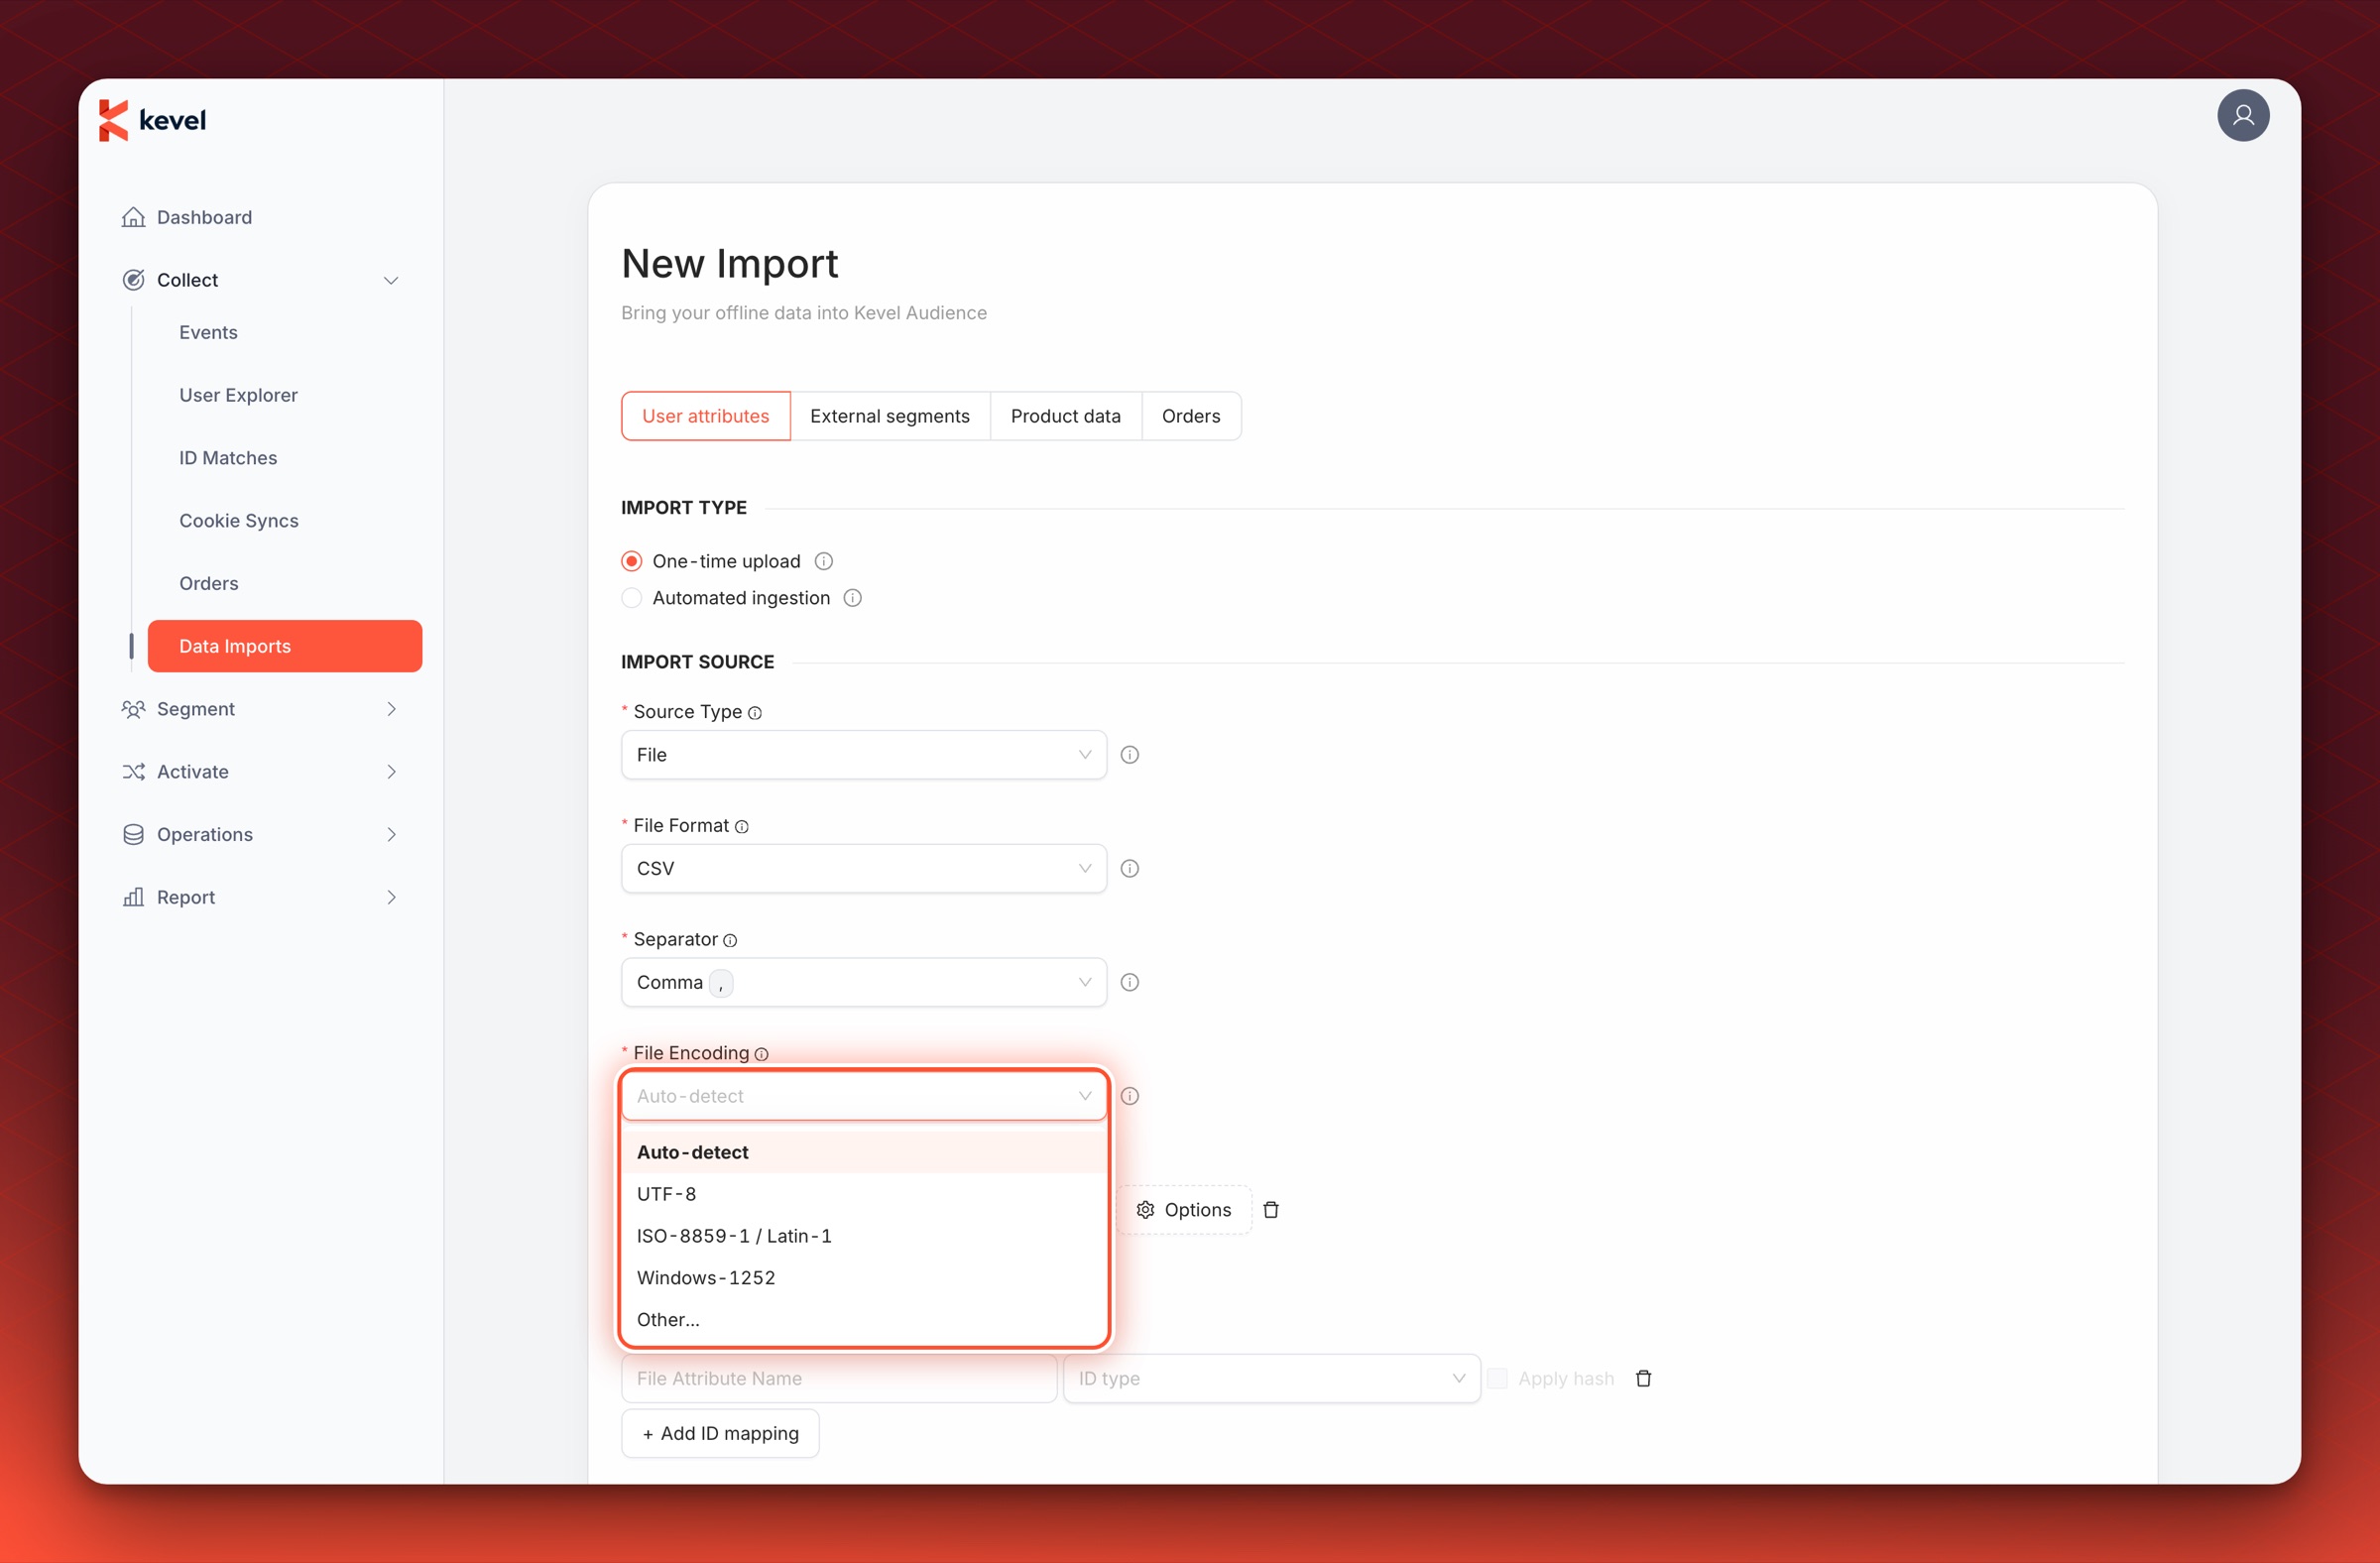
Users can specify the file encoding for the files being imported. Most files use the common UTF-8 encoding. However, files exported from certain CRM platforms or third-party providers may use different encodings, which can result in garbled text or errors during import. To address this, an auto-detection option for file encoding is available during import. This feature relies on heuristics and may not be accurate for all file encodings. If users know the correct encoding or if auto-detection fails, it is also possible to explicitly specify the file’s encoding.
Data Transformation
Data transformation allows you to rename fields and map values without editing the original file.
The most basic transformations are:
- Rename field (e.g. renaming the field "number_of_orders" to "completedOrders". The "number_of_orders" field will disappear).
- Copy field (e.g. copying the field "number_of_orders" to "completedOrders". The "number_of_orders" field will be unaffected).
- New field (e.g. adding the field "completedOrders" with the value 0 set for all lines)
- Delete field (e.g. Deletes the field "completedOrders")
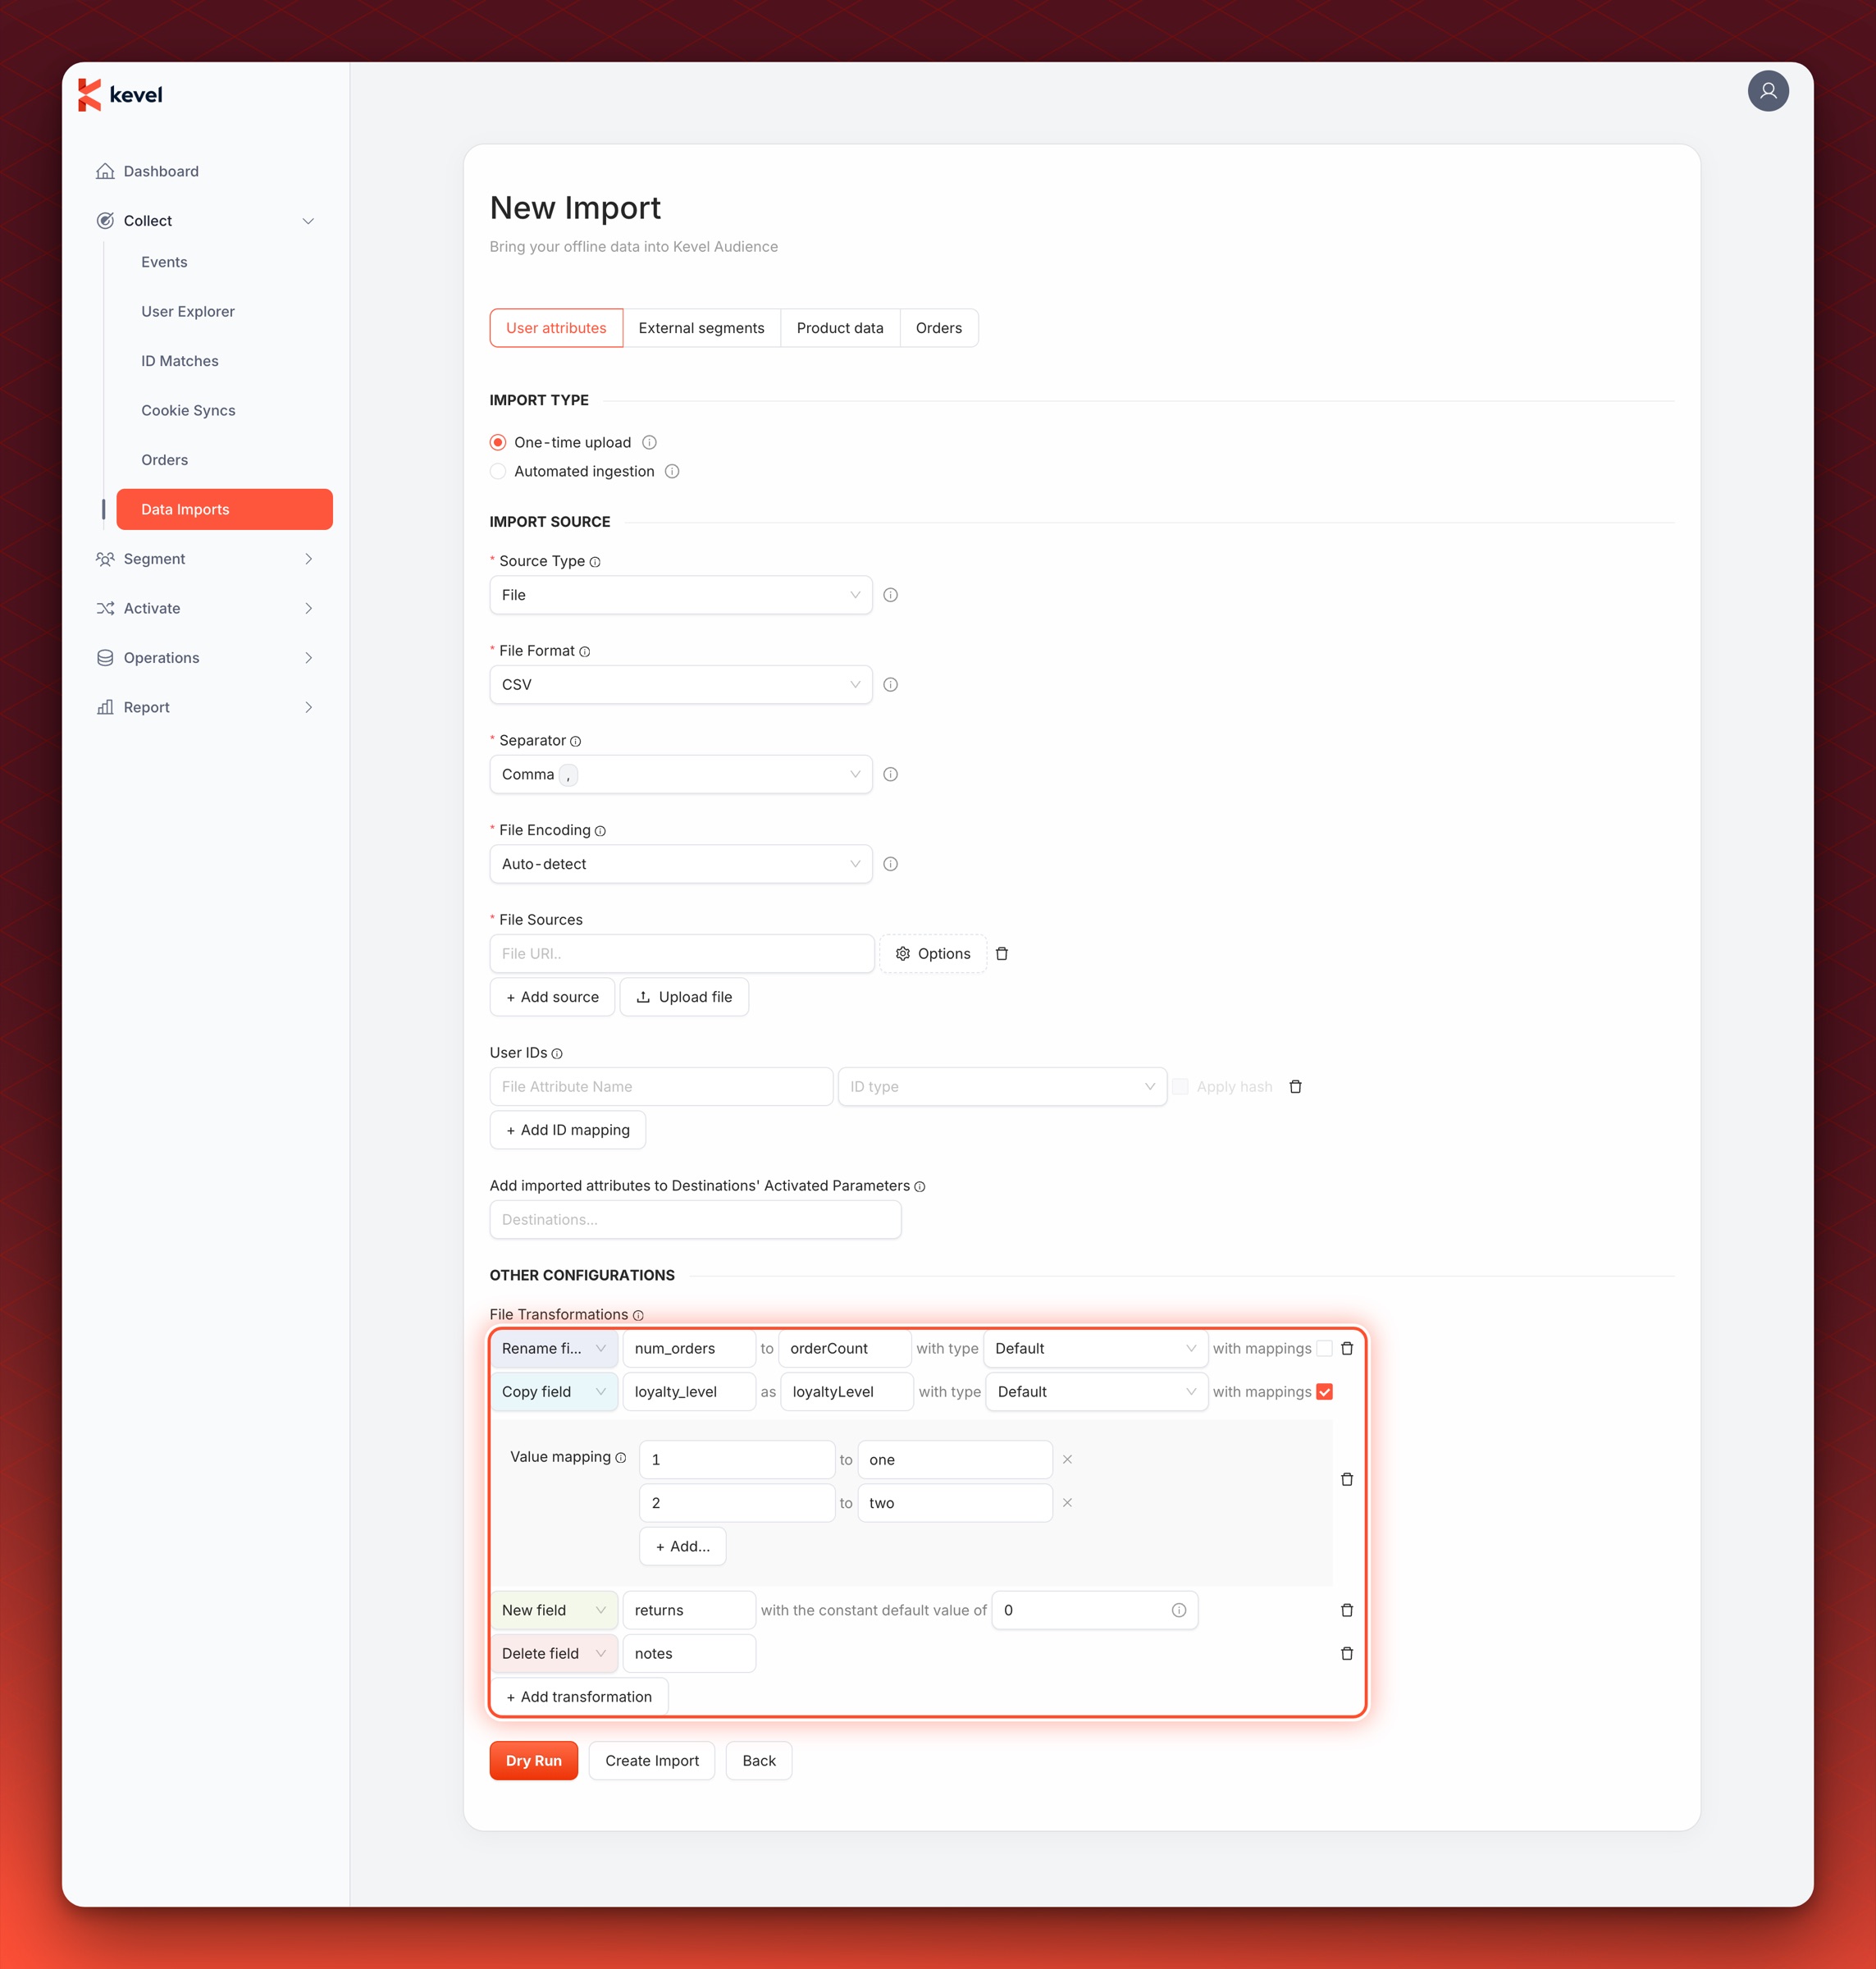
For the previous (Rename/Copy) transformations, you can also specify some value transformations to apply (i.e. transformations that will affect the values of the fields):
Mapping Field Values
Accepts an exhaustive list of from -> to values to transform. This transformation will iterate over the provided mappings and if the field's values matches the from value, it will be replaced with the to value. If no value matches, the field value will remain unaltered.
Example:
Given the mappings "1" -> "one" and "2" -> "two":
| Original value | Resulting value | Description |
|---|---|---|
"1" | "one" | Value is transformed |
"2" | "two" | Value is transformed |
"other" | "other" | Value is unaltered because it doesn't match any of the from values |
1 | 1 | Value 1 is different from value "1" (number instead text) so it doesn't match the "1" -> "one" mapping |
When dealing with CSV files, when this transformation takes place, all field values are interpreted as text.
Extracting a Custom Timestamp
Allows parsing a non-standard DateTime format into a ISO 8601 format. Requires the user to specify the custom DateTime pattern which the file to import is using.
Example:
Given the pattern yyyy/MM/dd hh:mm, the value 2021/01/21 14:25 will be converted to the
ISO 8601 format 2021-01-21T14:25:00Z.
Casting Field Value Types
Allows casting values to a specific type. This is useful mostly for User Imports where the values are directly set as user attributes and the type (most commonly, whether we're dealing with text, or a number) is relevant (e.g. to create segments with numeric rules with that attribute). On the other hand, while dealing with Order Imports or Product Imports, users don't need to cast the fields to the correct types. This happens because these types of imports have well-defined schemas that will implicitly perform the transformation to the data type.
The supported cast types are: string, integer, float and bool.
Example:
| Original value | Cast to String | Cast to Integer | Cast to Float | Cast to bool |
|---|---|---|---|---|
"2.4" | "2.4" | 2 | 2.4 | true |
"0" | "0" | 0 | 0.0 | false |
"car" | "car" | Error | Error | Error |
"false" | "false" | Error | Error | false |
3.8 | "3.8" | 3 | 3.8 | true |